gcc程序的编译过程和链接原理
本文主要讲述一下gcc程序的编译过程和链接原理。然后再会介绍一下gcc各组件模块及相关的使用方法。当前的操作系统环境以及GCC版本如下:
# lsb_release -a
No LSB modules are available.
Distributor ID: Ubuntu
Description:    Ubuntu 16.04.3 LTS
Release:        16.04
Codename:       xenial

# gcc --version
gcc (Ubuntu 5.4.0-6ubuntu1~16.04.10) 5.4.0 20160609
Copyright (C) 2015 Free Software Foundation, Inc.
This is free software; see the source for copying conditions.  There is NO
warranty; not even for MERCHANTABILITY or FITNESS FOR A PARTICULAR PURPOSE.
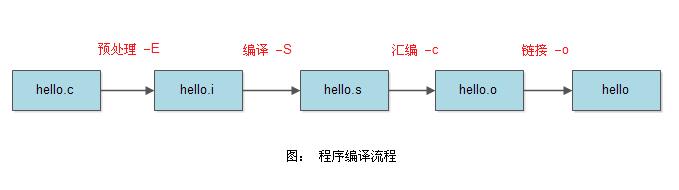
1. 程序编译流程
下面我们来看一下gcc编译的一些常用选项:
-
-o <file>: 指定将输出写入到file文件 -
-E: 只进行预处理,不会进行编译、汇编和链接
-
-S: 只进行编译,不进行汇编和链接
-
-c: 只进行编译和汇编,不进行链接
一个C/C++文件要经过预处理(preprocessing)、编译(compilation)、汇编(assembly)、和链接(link)才能变成可执行文件。
2. 程序编译示例
1) 示例程序
#include <stdio.h>

#define   MAX  20
#define   MIN  10

#define  _DEBUG
#define   SetBit(x)  (1<<x)

int main(int argc, char* argv[])
{
        printf("Hello World \n");
        printf("MAX = %d,MIN = %d,MAX + MIN = %d\n",MAX,MIN,MAX + MIN);

        #ifdef _DEBUG
                printf("SetBit(5) = %d,SetBit(6) = %d\n",SetBit(5),SetBit(6));
                printf("SetBit( SetBit(2) ) = %d\n",SetBit( SetBit(2) ));
        #endif

        return 0;
2) 预处理
我们使用如下命令对上述hello.c文件进行预处理:
# gcc -E -o hello.i hello.c
查看预处理后的结果:
# cat hello.i
# 1 "hello.c"
# 1 "<built-in>"
# 1 "<command-line>"
# 1 "/usr/include/stdc-predef.h" 1 3 4
# 1 "<command-line>" 2
# 1 "hello.c"
# 1 "/usr/include/stdio.h" 1 3 4
# 27 "/usr/include/stdio.h" 3 4
# 1 "/usr/include/features.h" 1 3 4
# 367 "/usr/include/features.h" 3 4
# 1 "/usr/include/i386-linux-gnu/sys/cdefs.h" 1 3 4
# 410 "/usr/include/i386-linux-gnu/sys/cdefs.h" 3 4
# 1 "/usr/include/i386-linux-gnu/bits/wordsize.h" 1 3 4
# 411 "/usr/include/i386-linux-gnu/sys/cdefs.h" 2 3 4
# 368 "/usr/include/features.h" 2 3 4
# 391 "/usr/include/features.h" 3 4
# 1 "/usr/include/i386-linux-gnu/gnu/stubs.h" 1 3 4


# 1 "/usr/include/i386-linux-gnu/gnu/stubs-32.h" 1 3 4
# 8 "/usr/include/i386-linux-gnu/gnu/stubs.h" 2 3 4
# 392 "/usr/include/features.h" 2 3 4
# 28 "/usr/include/stdio.h" 2 3 4


# 1 "/usr/lib/gcc/i686-linux-gnu/5/include/stddef.h" 1 3 4
# 216 "/usr/lib/gcc/i686-linux-gnu/5/include/stddef.h" 3 4

# 216 "/usr/lib/gcc/i686-linux-gnu/5/include/stddef.h" 3 4
typedef unsigned int size_t;
# 34 "/usr/include/stdio.h" 2 3 4

# 1 "/usr/include/i386-linux-gnu/bits/types.h" 1 3 4
# 27 "/usr/include/i386-linux-gnu/bits/types.h" 3 4
# 1 "/usr/include/i386-linux-gnu/bits/wordsize.h" 1 3 4
# 28 "/usr/include/i386-linux-gnu/bits/types.h" 2 3 4


typedef unsigned char __u_char;
typedef unsigned short int __u_short;
typedef unsigned int __u_int;
typedef unsigned long int __u_long;

...

extern int ftrylockfile (FILE *__stream) __attribute__ ((__nothrow__ , __leaf__)) ;


extern void funlockfile (FILE *__stream) __attribute__ ((__nothrow__ , __leaf__));
# 942 "/usr/include/stdio.h" 3 4

# 2 "hello.c" 2


# 9 "hello.c"
int main(int argc, char* argv[])
{
 printf("Hello World \n");
 printf("MAX = %d,MIN = %d,MAX + MIN = %d\n",20,10,20 + 10);


  printf("SetBit(5) = %d,SetBit(6) = %d\n",(1<<5),(1<<6));
  printf("SetBit( SetBit(2) ) = %d\n",(1<<(1<<2)));


 return 0;
}上面我们看到,预处理就是将要包含的文件插入原文件中、将宏定义展开、根据条件编译命令选择要使用的代码,最后将这些代码输出到一个.i文件中等待进一步处理。
3) 编译
使用如下命令对预处理后的文件进行编译:
# gcc -S -o hello.s hello.i
编译后的结果:
        .file   "hello.c"
        .section        .rodata
.LC0:
        .string "Hello World "
        .align 4
.LC1:
        .string "MAX = %d,MIN = %d,MAX + MIN = %d\n"
        .align 4
.LC2:
        .string "SetBit(5) = %d,SetBit(6) = %d\n"
.LC3:
        .string "SetBit( SetBit(2) ) = %d\n"
        .text
        .globl  main
        .type   main, @function
main:
.LFB0:
        .cfi_startproc
        leal    4(%esp), %ecx
        .cfi_def_cfa 1, 0
        andl    $-16, %esp
        pushl   -4(%ecx)
        pushl   %ebp
        .cfi_escape 0x10,0x5,0x2,0x75,0
        movl    %esp, %ebp
        pushl   %ecx
        .cfi_escape 0xf,0x3,0x75,0x7c,0x6
        subl    $4, %esp
        subl    $12, %esp
        pushl   $.LC0
        call    puts
        addl    $16, %esp
        pushl   $30
        pushl   $10
        pushl   $20
        pushl   $.LC1
        call    printf
        addl    $16, %esp
        subl    $4, %esp
        pushl   $64
        pushl   $32
        pushl   $.LC2
        call    printf
        addl    $16, %esp
        subl    $8, %esp
        pushl   $16
        pushl   $.LC3
        call    printf
        addl    $16, %esp
        movl    $0, %eax
        movl    -4(%ebp), %ecx
        .cfi_def_cfa 1, 0
        leave
        .cfi_restore 5
        leal    -4(%ecx), %esp
        .cfi_def_cfa 4, 4
        ret
        .cfi_endproc
.LFE0:
        .size   main, .-main
        .ident  "GCC: (Ubuntu 5.4.0-6ubuntu1~16.04.10) 5.4.0 20160609"
        .section        .note.GNU-stack,"",@progbits
编译就是把C/C++代码翻译成汇编代码。
4) 汇编
使用如下命令对hello.s进行汇编:
# gcc -c -o hello.o hello.s
汇编后的结果如下:
# file hello.o
hello.o: ELF 32-bit LSB relocatable, Intel 80386, version 1 (SYSV), not stripped
汇编就是将第三步编译输出的汇编代码翻译成符合一定格式的机器代码,在Linux系统上一般表现为ELF目标文件(OBJ文件)。
5) 链接
使用如下命令进行链接:
# gcc -o hello hello.o

# ls
hello  hello.c  hello.i  hello.o  hello.s
# file hello
hello: ELF 32-bit LSB executable, Intel 80386, version 1 (SYSV), dynamically linked,
interpreter /lib/ld-linux.so.2, for GNU/Linux 2.6.32, BuildID[sha1]=ecbd660b7657c508631d316cc33dd147fdd0f43b,
not stripped
链接就是将汇编生成的OBJ文件、系统库的OBJ文件、库文件链接起来,最终生成可以在特定平台上运行的可执行程序。
3. 链接的原理
下面我们来看一下链接过程是怎样的:
# gcc -c -o hello.o hello.c

# gcc -v -o hello hello.o
Using built-in specs.
COLLECT_GCC=gcc
COLLECT_LTO_WRAPPER=/usr/lib/gcc/i686-linux-gnu/5/lto-wrapper
Target: i686-linux-gnu
Configured with: ../src/configure -v --with-pkgversion='Ubuntu 5.4.0-6ubuntu1~16.04.10' \
 --with-bugurl=file:///usr/share/doc/gcc-5/README.Bugs \
 --enable-languages=c,ada,c++,java,go,d,fortran,objc,obj-c++ --prefix=/usr \
 --program-suffix=-5 --enable-shared --enable-linker-build-id --libexecdir=/usr/lib \
 --without-included-gettext --enable-threads=posix --libdir=/usr/lib --enable-nls \
 --with-sysroot=/ --enable-clocale=gnu --enable-libstdcxx-debug --enable-libstdcxx-time=yes \
 --with-default-libstdcxx-abi=new --enable-gnu-unique-object --disable-vtable-verify \
 --enable-libmpx --enable-plugin --with-system-zlib --disable-browser-plugin \
 --enable-java-awt=gtk --enable-gtk-cairo --with-java-home=/usr/lib/jvm/java-1.5.0-gcj-5-i386/jre \
 --enable-java-home --with-jvm-root-dir=/usr/lib/jvm/java-1.5.0-gcj-5-i386 \
 --with-jvm-jar-dir=/usr/lib/jvm-exports/java-1.5.0-gcj-5-i386 --with-arch-directory=i386 \
 --with-ecj-jar=/usr/share/java/eclipse-ecj.jar --enable-objc-gc --enable-targets=all \
 --enable-multiarch --disable-werror --with-arch-32=i686 --with-multilib-list=m32,m64,mx32 \
 --enable-multilib --with-tune=generic --enable-checking=release --build=i686-linux-gnu \
 --host=i686-linux-gnu --target=i686-linux-gnu
Thread model: posix
gcc version 5.4.0 20160609 (Ubuntu 5.4.0-6ubuntu1~16.04.10)
COMPILER_PATH=/usr/lib/gcc/i686-linux-gnu/5/:/usr/lib/gcc/i686-linux-gnu/5/: \
/usr/lib/gcc/i686-linux-gnu/:/usr/lib/gcc/i686-linux-gnu/5/:/usr/lib/gcc/i686-linux-gnu/
LIBRARY_PATH=/usr/lib/gcc/i686-linux-gnu/5/:/usr/lib/gcc/i686-linux-gnu/5/../../../i386-linux-gnu/: \
/usr/lib/gcc/i686-linux-gnu/5/../../../../lib/:/lib/i386-linux-gnu/:/lib/../lib/:/usr/lib/i386-linux-gnu/: \
/usr/lib/../lib/:/usr/lib/gcc/i686-linux-gnu/5/../../../:/lib/:/usr/lib/
COLLECT_GCC_OPTIONS='-v' '-o' 'hello' '-mtune=generic' '-march=i686'
 /usr/lib/gcc/i686-linux-gnu/5/collect2 -plugin /usr/lib/gcc/i686-linux-gnu/5/liblto_plugin.so \
 -plugin-opt=/usr/lib/gcc/i686-linux-gnu/5/lto-wrapper -plugin-opt=-fresolution=/tmp/cc8i33Fi.res \
 -plugin-opt=-pass-through=-lgcc -plugin-opt=-pass-through=-lgcc_s -plugin-opt=-pass-through=-lc \
 -plugin-opt=-pass-through=-lgcc -plugin-opt=-pass-through=-lgcc_s --sysroot=/ --build-id \
 --eh-frame-hdr -m elf_i386 --hash-style=gnu --as-needed -dynamic-linker /lib/ld-linux.so.2 -z relro \
 -o hello /usr/lib/gcc/i686-linux-gnu/5/../../../i386-linux-gnu/crt1.o \
 /usr/lib/gcc/i686-linux-gnu/5/../../../i386-linux-gnu/crti.o \
 /usr/lib/gcc/i686-linux-gnu/5/crtbegin.o -L/usr/lib/gcc/i686-linux-gnu/5 \
 -L/usr/lib/gcc/i686-linux-gnu/5/../../../i386-linux-gnu \
 -L/usr/lib/gcc/i686-linux-gnu/5/../../../../lib -L/lib/i386-linux-gnu \
 -L/lib/../lib -L/usr/lib/i386-linux-gnu -L/usr/lib/../lib \
 -L/usr/lib/gcc/i686-linux-gnu/5/../../.. hello.o -lgcc --as-needed -lgcc_s \
 --no-as-needed -lc -lgcc --as-needed -lgcc_s --no-as-needed \
 /usr/lib/gcc/i686-linux-gnu/5/crtend.o /usr/lib/gcc/i686-linux-gnu/5/../../../i386-linux-gnu/crtn.o
-
crt1.o、crti.o、crtbegin.o、crtend.o、crtn.o是gcc加入的系统标准启动文件,对于一般应用程序,这些启动是必需的。
-
-lc:链接libc库文件,其中libc库文件中就实现了printf等函数。
1) 动态链接
动态链接使用动态链接库进行链接,生成的程序在执行的时候需要加载所必需的动态库才能运行。动态链接生成的程序体积较小,但是必需依赖所需的动态库,否则无法执行。
默认情况下是使用动态链接:
# gcc -o hello_shared hello.o
# file hello_shared
hello_shared: ELF 32-bit LSB executable, Intel 80386, version 1 (SYSV), dynamically linked,
interpreter /lib/ld-linux.so.2, for GNU/Linux 2.6.32, BuildID[sha1]=ecbd660b7657c508631d316cc33dd147fdd0f43b,
 not stripped

# ls -al hello_shared
-rwxr-xr-x 1 root root 7388 Nov 10 20:42 hello_shared
2) 静态链接
静态链接使用静态库进行链接,生成的程序包含程序运行所需要的全部库,可以直接运行,不过静态链接生成的程序体积较大。
# gcc -static -o hello_static hello.o
# file hello_static
hello_static: ELF 32-bit LSB executable, Intel 80386, version 1 (GNU/Linux), statically linked,
 for GNU/Linux 2.6.32, BuildID[sha1]=69a0bf1ccdde6358bdc3cd8b59d950828586ef9a, not stripped

# ls -al hello_static
-rwxr-xr-x 1 root root 728340 Nov 10 20:45 hello_static
3) -nostartfiles选项
不链接系统标准启动文件,而标准库文件仍然正常使用:
# gcc -v -nostartfiles -o hello hello.o
# ./hello
Hello World
MAX = 20,MIN = 10,MAX + MIN = 30
SetBit(5) = 32,SetBit(6) = 64
SetBit( SetBit(2) ) = 16
Segmentation fault (core dumped)
可以看到可以正常打印相关内容,但是在系统退出时出现了崩溃。
4) -nostdlib选项
不链接系统标准启动文件和标准库文件:
# gcc -v -nostdlib -o hello hello.o
...
/lib/gcc/i686-linux-gnu/5/../../.. hello.o
/usr/bin/ld: warning: cannot find entry symbol _start; defaulting to 00000000080480d8
hello.o: In function `main':
hello.c:(.text+0x1a): undefined reference to `puts'
hello.c:(.text+0x2d): undefined reference to `printf'
hello.c:(.text+0x41): undefined reference to `printf'
hello.c:(.text+0x53): undefined reference to `printf'
collect2: error: ld returned 1 exit status
可以看到,会提示因为没有链接系统标准启动文件和标准库文件,从而导致链接失败。对于-nostdlib选项常用语裸机/bootloader、Linux内核等程序,因为它们不需要启动文件、标准库文件。
[参看]
