Linux下curl工具的使用
这里我们简要讲解一下Linux环境下curl工具的使用。curl命令是一个功能强大的网络工具,支持通过http、ftp等方式下载、上传文件。还可以用来抓取网页、网络监控等方面的开发,解决开发过程中遇到的问题。
1. curl工具的安装
在Linux环境下安装curl工具很简单,直接通过如下的命令安装即可:
// centos环境
//一般需要安装3个包,例如:curl-7.29.0-46.el7.x86_64.rpm  libcurl-7.29.0-46.el7.x86_64.rpm  libcurl-devel-7.29.0-46.el7.x86_64.rpm
# a=`yum list installed | grep "\<curl.x86_64\>"`
# if [ $a -eq "" ]; then yum install curl.x86_64; fi


//ubuntu环境
# sudo apt-get install curl
2. curl命令的基本使用
如下我们列出curl工具使用时的相关参数:
[root@localhost test-src]# curl --help
Usage: curl [options...] <url>
Options: (H) means HTTP/HTTPS only, (F) means FTP only
     --anyauth       Pick "any" authentication method (H)
 -a, --append        Append to target file when uploading (F/SFTP)
     --basic         Use HTTP Basic Authentication (H)
     --cacert FILE   CA certificate to verify peer against (SSL)
     --capath DIR    CA directory to verify peer against (SSL)
 -E, --cert CERT[:PASSWD] Client certificate file and password (SSL)
     --cert-type TYPE Certificate file type (DER/PEM/ENG) (SSL)
     --ciphers LIST  SSL ciphers to use (SSL)
     --compressed    Request compressed response (using deflate or gzip)
 -K, --config FILE   Specify which config file to read
     --connect-timeout SECONDS  Maximum time allowed for connection
 -C, --continue-at OFFSET  Resumed transfer offset
 -b, --cookie STRING/FILE  String or file to read cookies from (H)
 -c, --cookie-jar FILE  Write cookies to this file after operation (H)
     --create-dirs   Create necessary local directory hierarchy
     --crlf          Convert LF to CRLF in upload
     --crlfile FILE  Get a CRL list in PEM format from the given file
 -d, --data DATA     HTTP POST data (H)
     --data-ascii DATA  HTTP POST ASCII data (H)
     --data-binary DATA  HTTP POST binary data (H)
     --data-urlencode DATA  HTTP POST data url encoded (H)
     --delegation STRING GSS-API delegation permission
     --digest        Use HTTP Digest Authentication (H)
     --disable-eprt  Inhibit using EPRT or LPRT (F)
     --disable-epsv  Inhibit using EPSV (F)
 -D, --dump-header FILE  Write the headers to this file
     --egd-file FILE  EGD socket path for random data (SSL)
     --engine ENGINGE  Crypto engine (SSL). "--engine list" for list
 -f, --fail          Fail silently (no output at all) on HTTP errors (H)
 -F, --form CONTENT  Specify HTTP multipart POST data (H)
     --form-string STRING  Specify HTTP multipart POST data (H)
     --ftp-account DATA  Account data string (F)
     --ftp-alternative-to-user COMMAND  String to replace "USER [name]" (F)
     --ftp-create-dirs  Create the remote dirs if not present (F)
     --ftp-method [MULTICWD/NOCWD/SINGLECWD] Control CWD usage (F)
     --ftp-pasv      Use PASV/EPSV instead of PORT (F)
 -P, --ftp-port ADR  Use PORT with given address instead of PASV (F)
     --ftp-skip-pasv-ip Skip the IP address for PASV (F)
     --ftp-pret      Send PRET before PASV (for drftpd) (F)
     --ftp-ssl-ccc   Send CCC after authenticating (F)
     --ftp-ssl-ccc-mode ACTIVE/PASSIVE  Set CCC mode (F)
     --ftp-ssl-control Require SSL/TLS for ftp login, clear for transfer (F)
 -G, --get           Send the -d data with a HTTP GET (H)
 -g, --globoff       Disable URL sequences and ranges using {} and []
 -H, --header LINE   Custom header to pass to server (H)
 -I, --head          Show document info only
 -h, --help          This help text
     --hostpubmd5 MD5  Hex encoded MD5 string of the host public key. (SSH)
 -0, --http1.0       Use HTTP 1.0 (H)
     --ignore-content-length  Ignore the HTTP Content-Length header
 -i, --include       Include protocol headers in the output (H/F)
 -k, --insecure      Allow connections to SSL sites without certs (H)
     --interface INTERFACE  Specify network interface/address to use
 -4, --ipv4          Resolve name to IPv4 address
 -6, --ipv6          Resolve name to IPv6 address
 -j, --junk-session-cookies Ignore session cookies read from file (H)
     --keepalive-time SECONDS  Interval between keepalive probes
     --key KEY       Private key file name (SSL/SSH)
     --key-type TYPE Private key file type (DER/PEM/ENG) (SSL)
     --krb LEVEL     Enable Kerberos with specified security level (F)
     --libcurl FILE  Dump libcurl equivalent code of this command line
     --limit-rate RATE  Limit transfer speed to this rate
 -l, --list-only     List only names of an FTP directory (F)
     --local-port RANGE  Force use of these local port numbers
 -L, --location      Follow redirects (H)
     --location-trusted like --location and send auth to other hosts (H)
 -M, --manual        Display the full manual
     --mail-from FROM  Mail from this address
     --mail-rcpt TO  Mail to this receiver(s)
     --mail-auth AUTH  Originator address of the original email
     --max-filesize BYTES  Maximum file size to download (H/F)
     --max-redirs NUM  Maximum number of redirects allowed (H)
 -m, --max-time SECONDS  Maximum time allowed for the transfer
     --metalink      Process given URLs as metalink XML file
     --negotiate     Use HTTP Negotiate Authentication (H)
 -n, --netrc         Must read .netrc for user name and password
     --netrc-optional Use either .netrc or URL; overrides -n
     --netrc-file FILE  Set up the netrc filename to use
 -N, --no-buffer     Disable buffering of the output stream
     --no-keepalive  Disable keepalive use on the connection
     --no-sessionid  Disable SSL session-ID reusing (SSL)
     --noproxy       List of hosts which do not use proxy
     --ntlm          Use HTTP NTLM authentication (H)
 -o, --output FILE   Write output to <file> instead of stdout
     --pass PASS     Pass phrase for the private key (SSL/SSH)
     --post301       Do not switch to GET after following a 301 redirect (H)
     --post302       Do not switch to GET after following a 302 redirect (H)
     --post303       Do not switch to GET after following a 303 redirect (H)
 -#, --progress-bar  Display transfer progress as a progress bar
     --proto PROTOCOLS  Enable/disable specified protocols
     --proto-redir PROTOCOLS  Enable/disable specified protocols on redirect
 -x, --proxy [PROTOCOL://]HOST[:PORT] Use proxy on given port
     --proxy-anyauth Pick "any" proxy authentication method (H)
     --proxy-basic   Use Basic authentication on the proxy (H)
     --proxy-digest  Use Digest authentication on the proxy (H)
     --proxy-negotiate Use Negotiate authentication on the proxy (H)
     --proxy-ntlm    Use NTLM authentication on the proxy (H)
 -U, --proxy-user USER[:PASSWORD]  Proxy user and password
     --proxy1.0 HOST[:PORT]  Use HTTP/1.0 proxy on given port
 -p, --proxytunnel   Operate through a HTTP proxy tunnel (using CONNECT)
     --pubkey KEY    Public key file name (SSH)
 -Q, --quote CMD     Send command(s) to server before transfer (F/SFTP)
     --random-file FILE  File for reading random data from (SSL)
 -r, --range RANGE   Retrieve only the bytes within a range
     --raw           Do HTTP "raw", without any transfer decoding (H)
 -e, --referer       Referer URL (H)
 -J, --remote-header-name Use the header-provided filename (H)
 -O, --remote-name   Write output to a file named as the remote file
     --remote-name-all Use the remote file name for all URLs
 -R, --remote-time   Set the remote file's time on the local output
 -X, --request COMMAND  Specify request command to use
     --resolve HOST:PORT:ADDRESS  Force resolve of HOST:PORT to ADDRESS
     --retry NUM   Retry request NUM times if transient problems occur
     --retry-delay SECONDS When retrying, wait this many seconds between each
     --retry-max-time SECONDS  Retry only within this period
 -S, --show-error    Show error. With -s, make curl show errors when they occur
 -s, --silent        Silent mode. Don't output anything
     --socks4 HOST[:PORT]  SOCKS4 proxy on given host + port
     --socks4a HOST[:PORT]  SOCKS4a proxy on given host + port
     --socks5 HOST[:PORT]  SOCKS5 proxy on given host + port
     --socks5-hostname HOST[:PORT] SOCKS5 proxy, pass host name to proxy
     --socks5-gssapi-service NAME  SOCKS5 proxy service name for gssapi
     --socks5-gssapi-nec  Compatibility with NEC SOCKS5 server
 -Y, --speed-limit RATE  Stop transfers below speed-limit for 'speed-time' secs
 -y, --speed-time SECONDS  Time for trig speed-limit abort. Defaults to 30
     --ssl           Try SSL/TLS (FTP, IMAP, POP3, SMTP)
     --ssl-reqd      Require SSL/TLS (FTP, IMAP, POP3, SMTP)
 -2, --sslv2         Use SSLv2 (SSL)
 -3, --sslv3         Use SSLv3 (SSL)
     --ssl-allow-beast Allow security flaw to improve interop (SSL)
     --stderr FILE   Where to redirect stderr. - means stdout
     --tcp-nodelay   Use the TCP_NODELAY option
 -t, --telnet-option OPT=VAL  Set telnet option
     --tftp-blksize VALUE  Set TFTP BLKSIZE option (must be >512)
 -z, --time-cond TIME  Transfer based on a time condition
 -1, --tlsv1         Use => TLSv1 (SSL)
     --tlsv1.0       Use TLSv1.0 (SSL)
     --tlsv1.1       Use TLSv1.1 (SSL)
     --tlsv1.2       Use TLSv1.2 (SSL)
     --trace FILE    Write a debug trace to the given file
     --trace-ascii FILE  Like --trace but without the hex output
     --trace-time    Add time stamps to trace/verbose output
     --tr-encoding   Request compressed transfer encoding (H)
 -T, --upload-file FILE  Transfer FILE to destination
     --url URL       URL to work with
 -B, --use-ascii     Use ASCII/text transfer
 -u, --user USER[:PASSWORD]  Server user and password
     --tlsuser USER  TLS username
     --tlspassword STRING TLS password
     --tlsauthtype STRING  TLS authentication type (default SRP)
     --unix-socket FILE    Connect through this UNIX domain socket
 -A, --user-agent STRING  User-Agent to send to server (H)
 -v, --verbose       Make the operation more talkative
 -V, --version       Show version number and quit
 -w, --write-out FORMAT  What to output after completion
     --xattr        Store metadata in extended file attributes
 -q                 If used as the first parameter disables .curlrc
上面我们可以看到curl命令参数有很多,这里我们说明一下如下几个:
1) -v, --verbose: 小写的v参数,用于打印更多信息,包括发送的请求信息,这在调试脚本特别有用。
2) -m, --max-time SECONDS: 指定处理的最大时长
3) -H, --header LINE: 指定请求头参数
4) -s, --silent: 减少输出信息,比如进度等
5) --connect-timeout SECONDS: 指定尝试连接的最大时长
6) -x, --proxy [PROTOCOL://]HOST[:PORT]: 指定代理服务器的地址和端口,默认端口为1080
7) -T, --upload-file FILE: 传输文件到目标地址
8) -o, --output FILE: 指定输出文件名称
9) -d, --data DATA:** 指定http post的内容
10) --retry NUM: 假如产生错误的情况下,执行的重试次数
11) -e, --referer: 指定引用地址
12) -I, --head: 仅返回头部信息,使用head请求
13) -X, --request COMMAND: 指定请求方法OPTIONS、HEAD、GET、POST、PUT、DELETE、TRACE、CONNECT
3. GET请求
如下我们给出一些示例,展示如何使用Get请求:
# curl http://www.baidu.com   //回车之后,HTML内容打印在屏幕上;如果这里的URL指向的是一个文件或者一副图则可以直接下载到本地

# curl -i http://www.baidu.com  // 在输出信息中打印包括头部消息在内的整个消息

# curl -I http://www.baidu.com  // 只显示头部信息,其实这里采用的是HEAD请求,可以通过添加-v选项来查看请求与响应详细消息

# curl -v http://www.baidu.com  // 显示get请求全过程解析
另外一点需要注意的是,由于&符号在Linux shell环境下表示进程以后台方式运行,因此如果我们要传递多个参数的话,我们需要多&符号进行转义。例如:
# curl -X GET http://127.0.0.1/aaa?acl\&age=30
这里我们可以同时用tcpdump进行抓包,来观察响应的请求与响应:
// 窗口1启动tcpdump抓取数据包
# tcpdump -i ens33 -v -x -w curl_output.pcap host www.baidu.com

// 窗口2 curl请求目标地址
# curl http://www.baidu.com

//也可以通过如下方式模拟curl向目标地址请求数据(注意:这个百度服务器根据User-Agent不同,可能返回不同的结果)
# nc www.baidu.com 80 > abc.txt << EOF
> GET / HTTP/1.1
> User-Agent: curl/7.29.0
> Host: www.baidu.com
> Accept: */*
>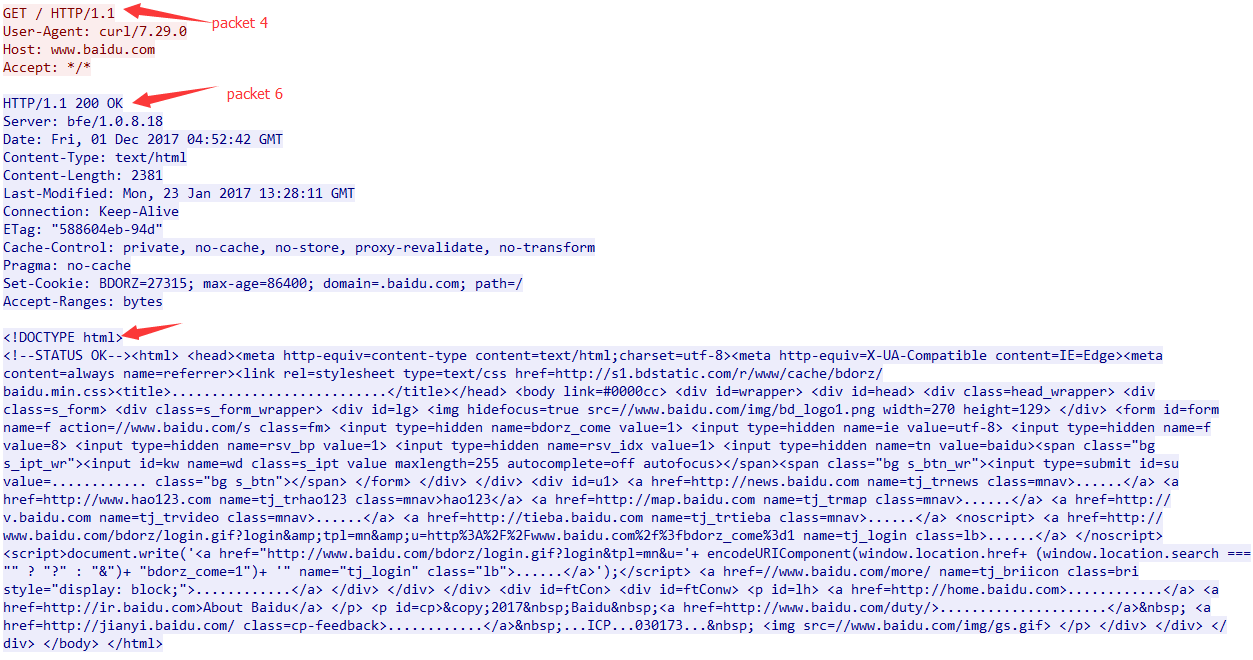
> EOF如下用wireshark打开上面抓取到的curl_output.pcap数据包:

注意到上面的第6个数据包,后面显示TCP segment of a reassembled PDU,其实5、6、8三个数据包合起来才是对第4个数据包的回复,这几个数据包的ack号都是一样的。请参看如下:
如下是HTTP请求与响应的一个跟踪:
4. 下载
下面给出一个具体示例:
# curl -o download_logo.png https://www.baidu.com/img/bd_logo1.png
  % Total    % Received % Xferd  Average Speed   Time    Time     Time  Current
                                 Dload  Upload   Total   Spent    Left  Speed
100  7877  100  7877    0     0  19440      0 --:--:-- --:--:-- --:--:-- 19497

# ls
download_logo.png可以看到执行命令后会有下载进度提示,完成100%后会自动退出,并且把相应的下载内容保存在-o指定的文件中。curl命令还有一个大写的-O选项,是按照服务器上的文件名保存到本地。如果执行
# curl -O www.baidu.com
是会报错的,提示找不到文件名,如果换成:
# curl -O www.baidu.com/index.html
就会自动保存文件为index.html。
5. 上传
下面给出一个具体示例:
-T, --upload-file FILE: 往服务器上传文件

//1: 向ftp服务器上传多个文件
# curl -T "img[1-1000].png" ftp://example.com/upload/

# curl -T "{file1,file2}" http://www.example.com
6. Post方法
下面给出一个具体示例:
1)
  // -d, –-data DATA: post请求提交参数

用法:
# curl -d "id=1&name=test" http://example.com/example.php   //需把请求参数与URL分开

//下面相当于提交了两个参数,当提交的参数中有特殊字符就需要先转义。如果有空格时,就需要转义成%20
# curl -d "id=1" -d "name=test" http://example.com/example.php


2)
   // --data-urlencode DATA: 特殊字符可以自动转义,无需人工事先转义

用法:
# curl --data-urlencode "name=April 1" http://example.com/example.php

3)
   //传递json格式
# curl -H "Content-Type: application/json" -X POST  --data '{"name":"test"}' http://example.com/example.php


4)
   // -F, --form CONTENT: 将HTTP multipart数据post到服务器

用法(Form表单形式上次):
# curl -F "fieldname=@/home/test/test.pic" http://example.com/example.php   //千万不能漏掉@符号
7. 设置referer
HTTP Referer是header的一部分,当浏览器向web服务器发送请求的时候,一般会带上Referer,告诉服务器我是从哪个页面链接过来的,服务器基于此可以获得一些信息用于处理。请参看:HTTP_REFERER
有的时候我们如果直接请求某个URL不能成功,它需要判断referer是否正确,那就可以通过-e或–referer参数模拟:
# curl -e http://www.example.com http://www.example.com8. 指定user agent
下面给出具体使用示例:
 -A, --user-agent STRING: 指定访问的客户端类型

例如:
# curl -A "Mozilla/5.0 (Windows NT 6.1; WOW64) AppleWebKit/537.36 (KHTML, like Gecko) Chrome/31.0.1650.63 Safari/537.36" www.baidu.com
9. 伪造cookie
下面给出具体使用示例:
-b, --cookie STRING/FILE: 指定cookies

# curl --cookie "name=xxx" http://www.example.com    //方法一
# curl --cookie /home/test/cookie.txt http://www.example.com   //方法二
10. 保存cookie
下面给出具体使用示例:
-c, --cookie-jar FILE: 保存操作时生成的cookie到文件

# curl -c /home/test/cookie.txt -d "username=abcd" -d "passwd=1234" http://www.example.com
11. 定义输出显示内容
-w, --write-out FORMAT: 定义在请求完成之后的输出内容。如常用的http码,tcp连接时间,域名解析的时间,握手时间及响应时间等,非常强大。

//1. 打印出返回的http吗
# curl -o /dev/null -s -w "%{http_code}\n" http://www.baidu.com
200

//2. 打印响应时间
# curl -o /dev/null -s -w "time_total: %{time_total}\n" http://www.baidu.com
12. PUT方法
HTTP协议文件上传的标准方法是使用PUT,此时curl命令使用-T参数:
# curl -T uploadfile http://www.upload.com/receive.cgi
13. 补充:表单处理
我们前面虽然也提到了post表单元素,但是我们在这里在做一个补充。
1) 在WEB页面设计中,form是很重要的元素。Form通常用来收集并向网站提交信息。提交信息的方法有两种,GET方法和POST方法。先讨论GET方法,例如有下面一段:

那么在浏览器上会出现一个文本框和一个标为”OK”的按钮。按下这个按钮,表单就用GET方法向服务器提交文本框的数据。例如原始页面是在www.hotmail.com/when/birth.html看到的,然后你的文本框中输入1905,然后按”OK”按钮,那么浏览器的URL现在应该是:www.hotmail.com/when/junk.cgi?birthyear=1905&press=OK。 对于这种网页,curl可以直接处理,例如想要获取上面的网页,只要输入:
# curl www.hotmail.com/when/junk.cgi?birthyear=1905&press=OK
就可以了。
2) 表达用来提交信息的第二种方法叫做POST方法,POST方法和GET方法的区别在于GET方法使用的时候浏览器中会产生目标URL,而POST方法不会。类似GET,这里有一个网页:

浏览器上也会出现一个文本框和一个标为”OK”的按钮。按下这个按钮,表单用POST方法向服务器提交数据。这时的URL是看不到的,因此需要使用特殊的方法来抓取这个页面:
# curl -d "birthyear=1905&press=OK" www.hotmail.com/when/junk.cgi
3) 而在1995年末,RFC 1867定义了一种新的POST方法,用来上传文件。主要用于把本地文件上传到服务器。此时页面是这样写的:

对于这种页面,curl的用法不同:
# curl -F upload=@local_file_name -F press=OK [URL]
这个命令的实质是将本地文件用POST上传到服务器。
14. 示例
通过脚本,向curl传递复杂参数:
#!/bin/sh

pic_name=id-card.jpg
pic_base64=`base64 -w 0 $pic_name > id_card.base64`
pic_encodeurl=`./urlencode id_card.base64`

echo "request={\"param1\":\"value1\",\"param2\":\"value2\",\"data\":{\"param3\":\"value3\",\"image\":\"$pic_encodeurl\"}}" > curl_data.dat

url=http://example.com/query
echo "curl -X POST -H 'Content-Type:application/x-www-form-urlencoded' --data @curl_data.dat $url"关于HTTP请求中经常会用到的Accept与Content-Type头,这里做一个说明:
Accept: 表示接口要返回给客户端的数据格式

Content-Type: 表示客户端发送给服务器端的数据格式
[参看]:
