git工作流程
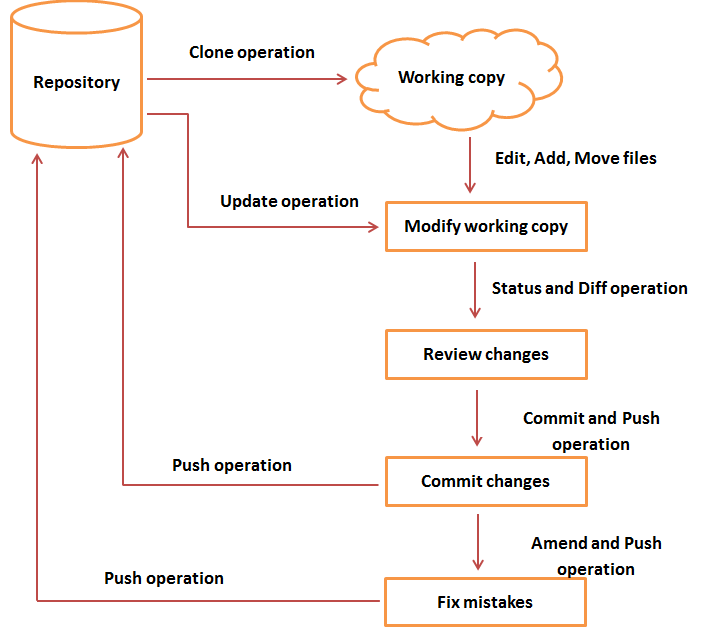
在本章,我们先介绍一下Git的工作流程,之后是整个工作流程所对应的一些操作。Git的一般工作流程如下:
-
将Git的一个存储库克隆为工作副本
-
可以通过添加/编辑文件修改工作副本
-
如有必要,还可以通过让其他开发人员一起来更改/更新工作副本
-
在提交之前查看更改
-
提交更改:如果一切正常,那么将您的更改推送到存储库
-
提交后,如果意识到某些错误并修改错误后,则将最后一个正确的修改提交并推送到存储库。
下面显示的是工作流程的图示:
1. 创建存储库
通常我们只需要在第三方托管平台GitHub注册好相应的账号,简单几步就可以创建好。
我们新建一个sample库,地址为:
https://github.com/ivanzz1001/sample.git
2. Git克隆操作
通常我们只需要在对应的目录执行git clone <url>即可:
$ git clone https://github.com/ivanzz1001/sample.git
3. 执行变更操作
现在克隆存储库之后,我们开始学习Git基本的文件修改和版本管理操作。假设要使用sample这个存储库来协同管理一个Python的项目。首先创建一个Python的代码文件: main.py,编写了一些代码完成并保存文件后, main.py现在的内容如下所示:
#!/usr/bin/python3
#coding=utf-8

print ("Life is short, you need Python !")
假设上面代码编译并通过了测试,一切正常。现在,我们可以安全地将这些更改添加到存储库。
查看当前工作区状态:
$ git status -s
?? main.pyGit在文件名之前显示两个问号。因为到目前操作为止,这些文件还不是Git的一部分(Git还不能控制这些文件),Git不知道该怎么处理这些文件。这就是为什么Git在文件名之前显示问号。
现在,Git添加操作(git add命令)将文件添加到暂存区域:
$ git add main.py在执行上述命令后,已将文件添加到存储区域,git status命令将显示临时区域中存在的文件:
$ git status -s
A main.py上面文件中,看到文件名称前面多了一个大写字母A,表示该文件已经添加到Git临时区域中了。
要提交更改,可以使用git commit命令,后跟-m选项。如果忽略了-m选项,Git将打开一个文本编辑器,我们可以在其中编写多行的提交备注信息。(注意:在执行git commit命令前,一定要先执行git add命令)
Administrator@2NIJJZIFGF14CRQ MINGW32 /f/worksp/sample (master)
$ git commit -m "this is main.py file commit mark use -m option"
[master 4862de1] this is main.py file commit mark use -m option
 1 file changed, 4 insertions(+)
create mode 100644 main.py在提交后,我们可以使用git log命令查看日志详细信息。它将使用提交ID、提交作者、提交日期和提交的SHA-1哈希显示所有提交的信息:
$ git log
commit 4862de19cfce5e99292747e4a23027cc78d22f7c
Author: ivanzz1001 <782740456@qq.com>
Date:   Sat Jun 15 10:20:09 2019 +0800

    this is main.py file commit mark use -m option

commit e038ad893f1e07aa58e834923607c777c8e43230
Author: ivanzz1001 <782740456@qq.com>
Date:   Fri Jun 14 19:23:57 2019 +0800

    Initial commit
前面我们说过,要提交修改过的文件,首先使用*git add
$ git commit -a -m "this is main.py file commit mark use -m option"4. Git查看更改
本章我们将演示如何查看Git存储库的文件和提交记录,并对存储库中的文件作修改和提交。比如,我们查看提交详细信息后,需要修改代码,或者添加更多的代码,或者对比提交结果。
西面使用git log命令查看详细日志信息:
$ git log
commit 4862de19cfce5e99292747e4a23027cc78d22f7c
Author: ivanzz1001 <782740456@qq.com>
Date:   Sat Jun 15 10:20:09 2019 +0800

    this is main.py file commit mark use -m option

commit e038ad893f1e07aa58e834923607c777c8e43230
Author: ivanzz1001 <782740456@qq.com>
Date:   Fri Jun 14 19:23:57 2019 +0800

Initial commit使用git show命令查看某一次提交的详细信息。git show命令采用SHA-1提交ID作为参数:
$ git show 4862de19cfce5e99292747e4a23027cc78d22f7c
commit 4862de19cfce5e99292747e4a23027cc78d22f7c
Author: ivanzz1001 <782740456@qq.com>
Date:   Sat Jun 15 10:20:09 2019 +0800

    this is main.py file commit mark use -m option

diff --git a/main.py b/main.py
new file mode 100644
index 0000000..478b6cd
--- /dev/null
+++ b/main.py
@@ -0,0 +1,4 @@
+#!/usr/bin/python3
+#coding=utf-8
+
+print ("Life is short, you need Python !")
\ No newline at end of file上面显示的结果中,可以看到符号+,表示添加的内容。如果有-,则表示删除的内容,现在我们打开main.py,修改后内容如下:
#!/usr/bin/python3
#coding=utf-8

print ("Life is short, you need Python !")

a = 10
b = 20然后使用命令git status查看当前工作区状态:
$ git status
On branch master
Your branch is ahead of 'origin/master' by 1 commit.
  (use "git push" to publish your local commits)
Changes not staged for commit:
  (use "git add <file>..." to update what will be committed)
  (use "git checkout -- <file>..." to discard changes in working directory)

        modified:   main.py

no changes added to commit (use "git add" and/or "git commit -a")测试代码后,通过运行git diff命令来回顾它的更改:
$ git diff
diff --git a/main.py b/main.py
index 478b6cd..5b909ce 100644
--- a/main.py
+++ b/main.py
@@ -1,4 +1,7 @@
 #!/usr/bin/python3
 #coding=utf-8

-print ("Life is short, you need Python !")
\ No newline at end of file
+print ("Life is short, you need Python !")
+
+a = 10
+b = 20
\ No newline at end of file可以看到符号+表示添加的内容,如果有-,则表示删除的内容。
现在使用以下命令将文件main.py添加到Git暂存区,然后提交代码:
$ git add main.py

Administrator@2NIJJZIFGF14CRQ MINGW32 /f/worksp/sample (master)
$ git commit -m "define two var a & b"
[master 50db2e9] define two var a & b
 1 file changed, 4 insertions(+), 1 deletion(-)
这样,最新修改的代码就提交完成。
5. 提交更改
在本章,我们将演示如何查看Git存储库的文件和提交文件记录,并对存储库中的文件作修改和提交。
在上一步中,我们已经修改了main.py文件中的代码,在代码中定义了两个变量并提交代码,但是要再次添加和修改main.py文件中的代码,实现新功能:求两个变量相加值。修改提交的操作更改包含提交消息的最后一个提交;它创建一个新的提交ID。
在修改操作之前,检查提交日志,如下命令所示:
$ git log
commit 50db2e9c18fe8e9b96391c1ba28df4fefac45400
Author: ivanzz1001 <782740456@qq.com>
Date:   Sat Jun 15 11:05:18 2019 +0800

    define two var a & b

commit 4862de19cfce5e99292747e4a23027cc78d22f7c
Author: ivanzz1001 <782740456@qq.com>
Date:   Sat Jun 15 10:20:09 2019 +0800

    this is main.py file commit mark use -m option

commit e038ad893f1e07aa58e834923607c777c8e43230
Author: ivanzz1001 <782740456@qq.com>
Date:   Fri Jun 14 19:23:57 2019 +0800

    Initial commit
下面我们打开文件,main.py中加入以下两行:
c = a + b
print("The value of c is ", c)
更正操作提交新的更改,并查看提交日志。首先查看状态,如下命令:
$ git status
On branch master
Your branch is ahead of 'origin/master' by 2 commits.
  (use "git push" to publish your local commits)
Changes not staged for commit:
  (use "git add <file>..." to update what will be committed)
  (use "git checkout -- <file>..." to discard changes in working directory)

        modified:   main.py

no changes added to commit (use "git add" and/or "git commit -a")
添加文件并查看状态,如下命令:
$ git add main.py

Administrator@2NIJJZIFGF14CRQ MINGW32 /f/worksp/sample (master)
$ git status
On branch master
Your branch is ahead of 'origin/master' by 2 commits.
  (use "git push" to publish your local commits)
Changes to be committed:
  (use "git reset HEAD <file>..." to unstage)

        modified:   main.py
提交更改的文件,如下所示:
$ git commit --amend -m "add the sum of a & b"
[master 9589658] add the sum of a & b
 Date: Sat Jun 15 11:05:18 2019 +0800
1 file changed, 7 insertions(+), 1 deletion(-)现在,使用git log命令将显示新的提交消息与新的提交ID(958965822323fa47b61c34b5380c5268569aadfc),最近一次提交的放前面:
$ git log
commit 958965822323fa47b61c34b5380c5268569aadfc
Author: ivanzz1001 <782740456@qq.com>
Date:   Sat Jun 15 11:05:18 2019 +0800

    add the sum of a & b

commit 4862de19cfce5e99292747e4a23027cc78d22f7c
Author: ivanzz1001 <782740456@qq.com>
Date:   Sat Jun 15 10:20:09 2019 +0800

    this is main.py file commit mark use -m option

commit e038ad893f1e07aa58e834923607c777c8e43230
Author: ivanzz1001 <782740456@qq.com>
Date:   Fri Jun 14 19:23:57 2019 +0800

    Initial commit
6. Git推送(push)操作
在上面的章节中,都要在本地编写文件代码和提交,维护管制自己的文件版本,然而这种自娱自乐的方式,意义不是很大。在这里将介绍如何与其他开发人员协同开发工作:每个开发人员都可以提交自己贡献的代码,并让其他人看到和修改。
要协同多人一起工作,可通过修改操作将代码最后一个确定版本提交,然后再推送变更。推送(Push)操作将数据永久存储到Git仓库。成功的推送操作后,其他开发人员可以看到新提交的变化。
执行git log命令查看提交的详细信息。最后一次提交的代码的ID是(958965822323fa47b61c34b5380c5268569aadfc):
$ git log
commit 958965822323fa47b61c34b5380c5268569aadfc
Author: ivanzz1001 <782740456@qq.com>
Date:   Sat Jun 15 11:05:18 2019 +0800

    add the sum of a & b

commit 4862de19cfce5e99292747e4a23027cc78d22f7c
Author: ivanzz1001 <782740456@qq.com>
Date:   Sat Jun 15 10:20:09 2019 +0800

    this is main.py file commit mark use -m option

commit e038ad893f1e07aa58e834923607c777c8e43230
Author: ivanzz1001 <782740456@qq.com>
Date:   Fri Jun 14 19:23:57 2019 +0800

Initial commit在推送操作之前,如果想要检查文件代码变化,可使用git show命令指定提交ID来查看具体的变化:
$ git show  958965822323fa47b61c34b5380c5268569aadfc
commit 958965822323fa47b61c34b5380c5268569aadfc
Author: ivanzz1001 <782740456@qq.com>
Date:   Sat Jun 15 11:05:18 2019 +0800

    add the sum of a & b

diff --git a/main.py b/main.py
index 478b6cd..1356cab 100644
--- a/main.py
+++ b/main.py
@@ -1,4 +1,10 @@
 #!/usr/bin/python3
 #coding=utf-8

-print ("Life is short, you need Python !")
\ No newline at end of file
+print ("Life is short, you need Python !")
+
+a = 10
+b = 20
+
+c = a + b
+print("The value of c is ", c)
\ No newline at end of file
如果对上面的提交修改没有疑义,则我们就可以将文件代码推送到远程存储库中,从而让其他开发人员可查看和修改这些代码,现在就来看看怎么提交这些写好的代码,使用以下命令:
$ git push origin master
Username for 'https://github.com': ivanzz1001
Counting objects: 6, done.
Delta compression using up to 2 threads.
Compressing objects: 100% (6/6), done.
Writing objects: 100% (6/6), 665 bytes | 0 bytes/s, done.
Total 6 (delta 1), reused 0 (delta 0)
remote: Resolving deltas: 100% (1/1), done.
To https://github.com/ivanzz1001/sample.git
   e038ad8..9589658  master -> master
如上所示,现在代码已经成功地提交到了远程存储库中了。我们可以登录GitHub来查看校验。
7.Git更新操作
假设另一个用户从GitHub上克隆下来了sample仓库,执行:
$ git clone https://github.com/ivanzz1001/sample.git
$ cd sample
$ git log
观察日志后,可以看到添加了文件代码来实现两个变量a和b之和,现在我们打开main.py,并修改优化代码。通过定义一个函数来实现两个变量之和。修改后,代码如下所示:
#!/usr/bin/python3
#coding=utf-8

print ("Life is short, you need Python !")

a = 10
b = 20

def sum(a, b)
   return (a+b)

c = sum(a, b)
print("The value of c is ", c)使用git diff命令查看更改,如下所示:
$ git diff
diff --git a/main.py b/main.py
index 1356cab..9467363 100644
--- a/main.py
+++ b/main.py
@@ -6,5 +6,8 @@ print ("Life is short, you need Python !")
 a = 10
 b = 20

-c = a + b
+def sum(a, b)
+   return (a+b)
+
+c = sum(a, b)
 print("The value of c is ", c)
\ No newline at end of file
经过测试,代码没有问题,提交了上面的更改。
$ git status
On branch master
Your branch is up-to-date with 'origin/master'.
Changes not staged for commit:
  (use "git add <file>..." to update what will be committed)
  (use "git checkout -- <file>..." to discard changes in working directory)

        modified:   main.py

no changes added to commit (use "git add" and/or "git commit -a")

Administrator@2NIJJZIFGF14CRQ MINGW32 /f/worksp/sample (master)
$ git add main.py

Administrator@2NIJJZIFGF14CRQ MINGW32 /f/worksp/sample (master)
$ git commit -m "add a new function sum(a,b)"
[master 30d3ff5] add a new function sum(a,b)
 1 file changed, 4 insertions(+), 1 deletion(-)
再次查看提交记录信息:
$ git log
commit 30d3ff5dc7eed0e81897f537bb531368654b2940
Author: ivanzz1001 <782740456@qq.com>
Date:   Sat Jun 15 23:34:47 2019 +0800

    add a new function sum(a,b)

commit 958965822323fa47b61c34b5380c5268569aadfc
Author: ivanzz1001 <782740456@qq.com>
Date:   Sat Jun 15 11:05:18 2019 +0800

    add the sum of a & b

commit 4862de19cfce5e99292747e4a23027cc78d22f7c
Author: ivanzz1001 <782740456@qq.com>
Date:   Sat Jun 15 10:20:09 2019 +0800

    this is main.py file commit mark use -m option

commit e038ad893f1e07aa58e834923607c777c8e43230
Author: ivanzz1001 <782740456@qq.com>
Date:   Fri Jun 14 19:23:57 2019 +0800

Initial commit经过上面添加和提交修改之后,其他开发人员并不能看到代码中定义的sum(a,b)函数,还需要将这里提交到本地的代码推送到远程存储库,使用以下命令:
$ git remote -v
origin  https://github.com/ivanzz1001/sample.git (fetch)
origin  https://github.com/ivanzz1001/sample.git (push)

Administrator@2NIJJZIFGF14CRQ MINGW32 /f/worksp/sample (master)
$ git push origin master
Username for 'https://github.com': ivanzz1001
Counting objects: 3, done.
Delta compression using up to 2 threads.
Compressing objects: 100% (3/3), done.
Writing objects: 100% (3/3), 419 bytes | 0 bytes/s, done.
Total 3 (delta 0), reused 0 (delta 0)
To https://github.com/ivanzz1001/sample.git
9589658..30d3ff5 master -> master现在代码已经成功提交到远程库中了,只要其他开发人员使用git clone或者git pull就可以得到这些新提交的代码了。
下面我们将学习其他一些更为常用的git命令,经过下面的学习,你就可以使用这些基本的git操作命令来对文件和代码进行管理和协同开发了。
1) 添加新函数
在开发人员A修改文件main.py中代码的同时,开发人员B在文件main.py中实现两个变量的乘积函数。修改后,main.py文件如下所示:
#!/usr/bin/python3
#coding=utf-8

print ("Life is short, you need Python !")


a = 10

b = 20
c = a + b
print("The value of c is  ", c)

def mul(a, b):
    return (a * b)
检查测试通过之后,执行如下命令添加到暂存区,并提交到仓库:
$ git status
$ git add
$ git commit -m "add a mul(a,b) function"
好了,现在要将上面的代码推送到远程存储仓库,使用以下命令:
$ git push origin master
Username for 'https://github.com': ivanzz1001
Counting objects: 3, done.
Delta compression using up to 2 threads.
To https://github.com/ivanzz1001/sample.git
 ! [rejected]        master -> master (fetch first)
error: failed to push some refs to 'https://github.com/ivanzz1001/sample.git'
hint: Updates were rejected because the remote contains work that you do
hint: not have locally. This is usually caused by another repository pushing
hint: to the same ref. You may want to first integrate the remote changes
hint: (e.g., 'git pull ...') before pushing again.
hint: See the 'Note about fast-forwards' in 'git push --help' for details.但Git推送失败,因为Git确定远程存储库和本地存储不同步。为什么呢?因为在向main.py添加以下片段时:
def mul(a, b)
return (a+b)另外一个开发人员A已经向远程仓库推送了修改的代码,所以这里在向远程仓库推送代码时,发现上面的新的推送代码,现在这个要推送的代码和远程仓库中的代码不一致,如果强行推送上去,Git不知道应该以谁的为准了。
所以,必须先更新本地存储库,只有在经过此步骤之后,才能推送自己的改变。
2) 获取最新更改
执行git pull命令以以将其本地存储库与远程存储库同步:
$ git pull
remote: Counting objects: 3, done.
remote: Compressing objects: 100% (3/3), done.
remote: Total 3 (delta 0), reused 0 (delta 0)
Unpacking objects: 100% (3/3), done.
From https://github.com/ivanzz1001/sample.git
   51de0f0..01c5462  master     -> origin/master
Auto-merging main.py
CONFLICT (content): Merge conflict in main.py
Automatic merge failed; fix conflicts and then commit the result.现在打开main.py内容如下:
#!/usr/bin/python3
#coding=utf-8

print ("Life is short, you need Python !")

d
a = 10

b = 20
<<<<<<< HEAD
c = a + b
print("The value of c is  ", c)

def mul(a, b):
    return (a * b)
=======

def sum(a, b):
    return (a+b)

c = sum(a, b)
print("The value of c is  ", c)
>>>>>>> 01c54624879782e4657dd6c166ce8818f19e8251拉取操作后,检查日志消息,并发现其他开发人员的提交的详细信息,提交ID为01c54624879782e4657dd6c166ce8818f19e8251。
打开main.py文件,修改其中的代码,修改完成后保存,文件的代码如下所示:
#!/usr/bin/python3
#coding=utf-8

print ("Life is short, you need Python !")

a = 10
b = 20

def mul(a, b)
   return (a*b)

def sum(a, b)
   return (a+b)

c = sum(a, b)
print("The value of c is ", c)
再次添加提交,最后推送,如下命令:
$ git add main.py

Administrator@2NIJJZIFGF14CRQ MINGW32 /f/worksp/sample (master)
$ git commit -m "synchronized with the remote repository"
[master f260043] synchronized with the remote repository
 1 file changed, 3 insertions(+)

Administrator@2NIJJZIFGF14CRQ MINGW32 /f/worksp/sample (master)
$ git status
On branch master
Your branch is ahead of 'origin/master' by 1 commit.
  (use "git push" to publish your local commits)
nothing to commit, working tree clean

Administrator@2NIJJZIFGF14CRQ MINGW32 /f/worksp/sample (master)
$ git push origin master
Username for 'https://github.com': ivanzz1001
Counting objects: 3, done.
Delta compression using up to 2 threads.
Compressing objects: 100% (3/3), done.
Writing objects: 100% (3/3), 350 bytes | 0 bytes/s, done.
Total 3 (delta 1), reused 0 (delta 0)
remote: Resolving deltas: 100% (1/1), completed with 1 local object.
To https://github.com/ivanzz1001/sample.git
   30d3ff5..f260043  master -> master
现在,一个新的代码又提交并推送到远程仓库中了。
8. Git隐藏(Stash)操作
假设您正在为产品新的功能编写/实现代码,当正在编写代码时,突然出现软件客户端升级。这时,您必须将新编写的功能代码保留几小时然后去处理升级的问题。在这段时间内不能提交代码,也不能丢弃您的代码更改。所以需要临时等待一段时间,您可以存储部分更改,然后再提交它。
在Git中,隐藏操作将使您能够修改跟踪文件,阶段更改,并将其保存在一系列未完成的更改中,并可以随时重新应用。
$ git status
On branch master
Your branch is up-to-date with 'origin/master'.
Changes not staged for commit:
  (use "git add <file>..." to update what will be committed)
  (use "git checkout -- <file>..." to discard changes in working directory)

        modified:   main.py

no changes added to commit (use "git add" and/or "git commit -a")现在要切换分支以进行客户升级,但不想提交一直在做的工作,那么可以将当前工作的改变隐藏起来。要将一个新的存根推导堆栈上,运行git stash命令:
$ git stash
Saved working directory and index state WIP on master: f260043 synchronized with
 the remote repository
HEAD is now at f260043 synchronized with the remote repository现在工作目录是干净的,所有更改都保存在堆栈中。现在使用git status命令来查看当前工作区的状态:
$ git status
On branch master
Your branch is up-to-date with 'origin/master'.
nothing to commit, working tree clean现在可以安全的切换分支并在其他地方工作。通过使用git stash list命令来查看已存在更改的列表。
$ git stash list
stash@{0}: WIP on master: f260043 synchronized with the remote repository假设您已经解决了客户升级问题,想要重新开始新的功能的代码编写,查找上次没有写完成的代码,只需执行git stash pop命令即可从堆栈中弹出更改并将其放置到当前工作目录中:
$ git stash pop
On branch master
Your branch is up-to-date with 'origin/master'.
Changes not staged for commit:
  (use "git add <file>..." to update what will be committed)
  (use "git checkout -- <file>..." to discard changes in working directory)

        modified:   main.py

no changes added to commit (use "git add" and/or "git commit -a")
Dropped refs/stash@{0} (3307d3f6c18f70351a7bd851deeaa2165c77bdbe)

Administrator@2NIJJZIFGF14CRQ MINGW32 /f/worksp/sample (master)
$ git status
On branch master
Your branch is up-to-date with 'origin/master'.
Changes not staged for commit:
  (use "git add <file>..." to update what will be committed)
  (use "git checkout -- <file>..." to discard changes in working directory)

        modified:   main.py

no changes added to commit (use "git add" and/or "git commit -a")可以看到,工作区中修改的文件(main.py) 又显示了。现在我们就可以继续编写上次未完成的代码了。
9. Git移动操作
顾名思义,移动操作将目录或文件从一个位置移动到另一个位置。例如,我们想要将源代码移动到src目录中,修改后的目录结构将显示如下:
$ pwd
/f/worksp/sample

Administrator@2NIJJZIFGF14CRQ MINGW32 /f/worksp/sample (master)
$ ls
main.py*  README.md

Administrator@2NIJJZIFGF14CRQ MINGW32 /f/worksp/sample (master)
$ mkdir src

Administrator@2NIJJZIFGF14CRQ MINGW32 /f/worksp/sample (master)
$ git mv main.py src/

Administrator@2NIJJZIFGF14CRQ MINGW32 /f/worksp/sample (master)
$ git status
On branch master
Your branch is up-to-date with 'origin/master'.
Changes to be committed:
  (use "git reset HEAD <file>..." to unstage)

        renamed:    main.py -> src/main.py
为了使这些更改永久性,必须将修改的目录结构推送到远程仓库,以便其他开发人员可以看到这些修改:
$ git commit -m "modified directory structure"
[master 4fb8e52] modified directory structure
 1 file changed, 0 insertions(+), 0 deletions(-)
 rename main.py => src/main.py (100%)

Administrator@2NIJJZIFGF14CRQ MINGW32 /f/worksp/sample (master)
$ git push
Username for 'https://github.com': ivanzz1001
Counting objects: 3, done.
Delta compression using up to 2 threads.
Compressing objects: 100% (2/2), done.
Writing objects: 100% (3/3), 315 bytes | 0 bytes/s, done.
Total 3 (delta 0), reused 0 (delta 0)
To https://github.com/ivanzz1001/sample.git
f260043..4fb8e52 master -> master在其他开发人员的本地存储库中,可以通过执行git pull来与远程存储库进行同步,之后就可以看到新的目录结构了.
10. Git重命名操作
到目前为止,我们前面已经建了一个python的源代码文件,现在,要修改main.py文件的名称把它作为一个新的模块,假设这里要把main.py文件的名称更新为module.py:
$ pwd
/f/worksp/sample

Administrator@2NIJJZIFGF14CRQ MINGW32 /f/worksp/sample (master)
$ cd src

Administrator@2NIJJZIFGF14CRQ MINGW32 /f/worksp/sample/src (master)
$ ls
main.py*

Administrator@2NIJJZIFGF14CRQ MINGW32 /f/worksp/sample/src (master)
$ git mv main.py module.py

Administrator@2NIJJZIFGF14CRQ MINGW32 /f/worksp/sample/src (master)
$ git status -s
R main.py -> module.pyGit在文件名之前显示R,表示文件已被重命名。
对于提交操作,需要使用-a标志,这使git commit自动检测修改的文件:
$ git commit -a -m "rename main.py to module.py"
[master 2d08ad6] rename main.py to module.py
 1 file changed, 0 insertions(+), 0 deletions(-)
 rename src/{main.py => module.py} (100%)
提交后,我们将更改推送到远程存储库:
$ git push origin master
Username for 'https://github.com': ivanzz1001
Counting objects: 3, done.
Delta compression using up to 2 threads.
Compressing objects: 100% (2/2), done.
Writing objects: 100% (3/3), 318 bytes | 0 bytes/s, done.
Total 3 (delta 0), reused 0 (delta 0)
To https://github.com/ivanzz1001/sample.git
4fb8e52..2d08ad6 master -> master现在,其他开发人员可以通过使用git pull命令更新本地存储库来查看这些修改。
11. Git删除操作
其他开发人员在更新本地存储库后,在src目录中找到一个module.py文件。现在假设要对上面的项目中代码结构进行重构,代码文件module.py已经不再使用了,要将它删除,那么应该怎么做呢? 请参考以下命令:
$ pwd
/f/worksp/sample

Administrator@2NIJJZIFGF14CRQ MINGW32 /f/worksp/sample (master)
$ ls
README.md  src/

Administrator@2NIJJZIFGF14CRQ MINGW32 /f/worksp/sample (master)
$ git rm src/module.py
rm 'src/module.py'

Administrator@2NIJJZIFGF14CRQ MINGW32 /f/worksp/sample (master)
$ git commit -m "remove/delete module.py"
[master 34faaf0] remove/delete module.py
 1 file changed, 16 deletions(-)
 delete mode 100644 src/module.py
$ git push origin master接着我们可以在另外一台电脑上执行git pull拉去最新代码,查看sample/src目录中的文件是否存在了。
12. Git修正错误
人非圣贤孰能无过,所以每个VCS都提供一个功能来修复错误,直到Git控制的某一点上。Git提供了一个功能,可用于撤销对本地存储库所做的修改。
假设用户意外地对本地存储库进行了一些更改,然后想要撤销这些更改。在这种情况下,恢复操作起着重要的作用。
1) 恢复未提交的更改
假设我们不小心修改了本地存储库中的一个文件,此时想撤销这些修改。为了处理这种情况,我们可以使用git checkout命令。可以使用此命令来还原文件的内容。
为了更好的演示,我们首先在sample/src目录下创建一个文件string.py,其代码如下所示:
#!/usr/bin/python3

var1 = 'Hello World!'
var2 = "Python Programming"

print ("var1[0]: ", var1[0])
print ("var2[1:5]: ", var2[1:5]) # 切片加索引
并使用以下命令将此文件推送到远程仓库:
$ pwd
/f/worksp/sample

Administrator@2NIJJZIFGF14CRQ MINGW32 /f/worksp/sample ((2d08ad6...))
$ git add src/

Administrator@2NIJJZIFGF14CRQ MINGW32 /f/worksp/sample ((2d08ad6...))
$ git status
HEAD detached at 2d08ad6
Changes to be committed:
  (use "git reset HEAD <file>..." to unstage)

        new file:   src/string.py


Administrator@2NIJJZIFGF14CRQ MINGW32 /f/worksp/sample ((2d08ad6...))
$ git commit -m "add new file string.py"
[detached HEAD de3783f] add new file string.py
 1 file changed, 7 insertions(+)
 create mode 100644 src/string.py

Administrator@2NIJJZIFGF14CRQ MINGW32 /f/worksp/sample ((de3783f...))
$ git push origin master
Username for 'https://github.com': ivanzz1001
Counting objects: 2, done.
Delta compression using up to 2 threads.
Compressing objects: 100% (1/1), done.
Writing objects: 100% (2/2), 236 bytes | 0 bytes/s, done.
Total 2 (delta 0), reused 0 (delta 0)
To https://github.com/ivanzz1001/sample.git
2d08ad6..34faaf0 master -> master现在已经将string.py添加到远程存储库中了。
假设我们不小心或者有心修改了本地存储库中的一个文件。但现在不想要这些修改内容了,也就是说想要撤销修改。要处理这种情况,那么可以使用git checkout命令。可以使用此命令来还原文件的内容:
$ pwd
/f/worksp/sample

Administrator@2NIJJZIFGF14CRQ MINGW32 /f/worksp/sample ((de3783f...))
$ echo 'print ("just for test")' >> src/string.py

Administrator@2NIJJZIFGF14CRQ MINGW32 /f/worksp/sample ((de3783f...))
$ cat src/string.py
#!/usr/bin/python3

var1 = 'Hello World!'
var2 = "Python Programming"

print ("var1[0]: ", var1[0])
print ("var2[1:5]: ", var2[1:5]) # ▒▒Ƭ▒▒▒▒▒▒
print ("just for test")

Administrator@2NIJJZIFGF14CRQ MINGW32 /f/worksp/sample ((de3783f...))
$ git status
HEAD detached from 2d08ad6
Changes not staged for commit:
  (use "git add <file>..." to update what will be committed)
  (use "git checkout -- <file>..." to discard changes in working directory)

        modified:   src/string.py

no changes added to commit (use "git add" and/or "git commit -a")

$ git checkout -- src/string.py

Administrator@2NIJJZIFGF14CRQ MINGW32 /f/worksp/sample ((de3783f...))
$ git status
HEAD detached from 2d08ad6
nothing to commit, working tree clean此外,还可以使用git checkout命令从本地存储库中获取已删除的文件。假设我们从本地存储库中删除一个文件,我们想要恢复这个文件,那么可以通过使用git checkout命令来实现这一点:
$ ls src/
module.py*  string.py*

Administrator@2NIJJZIFGF14CRQ MINGW32 /f/worksp/sample ((de3783f...))
$ rm -rf src/string.py

Administrator@2NIJJZIFGF14CRQ MINGW32 /f/worksp/sample ((de3783f...))
$ git status -s
D src/string.pyGit在文件名前显示字母D,表示该文件已从本地存储库中删除:
$ git checkout -- src/string.py

Administrator@2NIJJZIFGF14CRQ MINGW32 /f/worksp/sample ((de3783f...))
$ ls src/
module.py*  string.py*

Administrator@2NIJJZIFGF14CRQ MINGW32 /f/worksp/sample ((de3783f...))
$ git status
HEAD detached from 2d08ad6
nothing to commit, working tree clean注意:在提交之前执行这些操作。
2) 删除分段区域的更改
我们已经看到,当执行添加操作时,文件将从本地存储库移动到暂存区域。如果用户意外修改文件并将其添加到暂存区域,则可以通过git checkout命令恢复其更改。
在Git中,有一个HEAD指针总是指向最新的提交。如果要从分段区域撤销更改,则可以使用git checkout命令,但是使用checkout命令,必须提供一个附加参数,即HEAD指针。附加的提交指针参数指示git checkout命令重置工作树,并删除分段更改。
让我们假设从本地存储库修改一个文件。如果查看此文件的状态,它将显示该文件已修改但未添加到暂存区域:
$ pwd
/f/worksp/sample

Administrator@2NIJJZIFGF14CRQ MINGW32 /f/worksp/sample ((de3783f...))
$ git status
HEAD detached from 2d08ad6
Changes not staged for commit:
  (use "git add <file>..." to update what will be committed)
  (use "git checkout -- <file>..." to discard changes in working directory)

        modified:   src/string.py

no changes added to commit (use "git add" and/or "git commit -a")

Administrator@2NIJJZIFGF14CRQ MINGW32 /f/worksp/sample ((de3783f...))
$ git add src/string.pygit状态显示该文件存在于暂存区域,现在使用git checkout命令恢复该文件,并查看还原文件的状态:
$ git checkout head -- src/string.py

Administrator@2NIJJZIFGF14CRQ MINGW32 /f/worksp/sample ((de3783f...))
$ git status
HEAD detached from 2d08ad6
nothing to commit, working tree clean
3) 用Git复位移动头指针
经过少量更改后,可以决定删除这些更改。git reset命令用于复位或恢复更改。我们可以执行三种不同类型的复位操作。
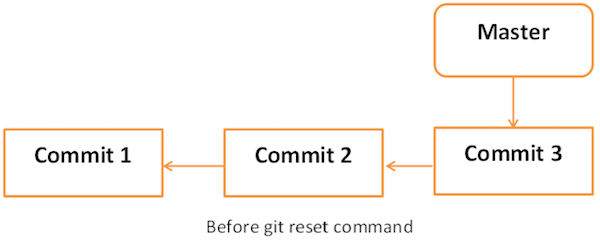
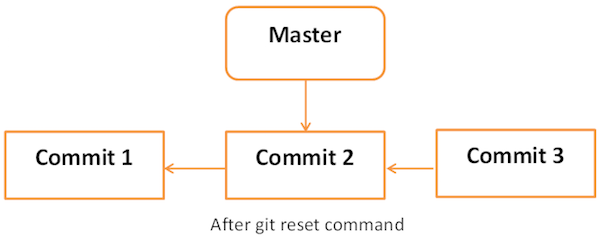
下图显示了git reset命令的图示:
git reset命令之前:
git reset命令之后:
- soft选项
每个分支都有一个HEAD指针,它指向最新的提交。如果用--soft选项后跟提交ID的git reset命令,那么它将仅重置HEAD指针而不会破坏任何东西。
.git/refs/heads/master文件存储HEAD指针的提交ID,可以使用git log -1命令验证它:
$ pwd
/f/worksp/sample

Administrator@2NIJJZIFGF14CRQ MINGW32 /f/worksp/sample ((de3783f...))
$ cat .git/refs/heads/master
e8c14b2341c2787741e859591154a92e601cd54e
现在,查看最新前两个提交的ID,最近一次ID与上述提交ID一致:
$ git log -2
commit e8c14b2341c2787741e859591154a92e601cd54e
Author: ivanzz1001 <782740456@qq.com>
Date:   Sun Jun 16 17:54:39 2019 +0800

    add module.py

commit 1f6d8dac970e8d2440eab4c0fce93588d2bf1433
Merge: 34faaf0 de3783f
Author: ivanzz1001 <782740456@qq.com>
Date:   Sun Jun 16 17:18:04 2019 +0800

Merge branch 'temp'下面我们重置HEAD指针:
$ git reset --soft 2d08ad6ba68b554c9d7ff2b998a816b7e6991f93

Administrator@2NIJJZIFGF14CRQ MINGW32 /f/worksp/sample (master)
$ git status
On branch master
Your branch is behind 'origin/master' by 4 commits, and can be fast-forwarded.
  (use "git pull" to update your local branch)
Changes to be committed:
  (use "git reset HEAD <file>..." to unstage)

new file: src/string.py现在查看.git/refs/heads/master文件的内容:
$ cat .git/refs/heads/master
2d08ad6ba68b554c9d7ff2b998a816b7e6991f93
来自文件的提交ID已更改,现在通过查看提交消息进行验证:
$ git log -2
commit 2d08ad6ba68b554c9d7ff2b998a816b7e6991f93
Author: ivanzz1001 <782740456@qq.com>
Date:   Sun Jun 16 10:37:24 2019 +0800

    rename main.py to module.py

commit 4fb8e522eaee991caead45b48d72b6fedaff78ff
Author: ivanzz1001 <782740456@qq.com>
Date:   Sun Jun 16 10:17:43 2019 +0800

modified directory structure- mixed选项
使用--mixed选项的Git重置将从尚未提交的暂存区域还原这些更改。它仅从暂存区域恢复更改,对文件的工作副本进行的实际更改不受影响。默认Git复位等效于执行git reset --mixed。
- hard选项
如果使用--hard选项与Git重置命令,它将清除分段区域;它会将HEAD指针重置为特定提交ID的最新提交,并删除本地文件更改。
让我们查看提交ID:
$ git log -1
commit 2d08ad6ba68b554c9d7ff2b998a816b7e6991f93
Author: ivanzz1001 <782740456@qq.com>
Date:   Sun Jun 16 10:37:24 2019 +0800

    rename main.py to module.py
通过在文件开头添加单行注释来修改文件或者往文件里添加其他代码:
$ head -2 src/string.py
#!/usr/bin/python3
# this is a comment

$ git status -s
AM src/string.py将修改的文件添加到暂存区域,并使用git status命令进行验证:
$ git add src/string.py

Administrator@2NIJJZIFGF14CRQ MINGW32 /f/worksp/sample (master)
$ git status
On branch master
Your branch is behind 'origin/master' by 4 commits, and can be fast-forwarded.
  (use "git pull" to update your local branch)
Changes to be committed:
  (use "git reset HEAD <file>..." to unstage)

new file: src/string.pyGit状态显示该文件存在于暂存区域。现在,重置HEAD与--hard选项:
$ git reset --hard 2d08ad6ba68b554c9d7ff2b998a816b7e6991f93
HEAD is now at 2d08ad6 rename main.py to module.py

$ ls src/
module.py*
git reset命令成功,这将从分段区域还原文件,并删除对文本文件所做的任何本地修改。
$ git status
On branch master
Your branch is behind 'origin/master' by 4 commits, and can be fast-forwarded.
  (use "git pull" to update your local branch)
nothing to commit, working tree clean
Git状态显示已经恢复到了提交时的那个版本。
通常我们将git reset与git branch搭配一起使用。
13. Git标签操作
标签操作允许为仓库中的特定版本提供有意义的名称,假设项目中有两个程序员: maxsu和minsu,他们决定标记项目代码,以便以后可以更容易访问这些代码。
1) 创建标签
使用git tag命令来标记当前HEAD指针。在创建标签时需要提供-a选项的标签名称,并提供带-m选项的标签消息。
$ pwd
/f/worksp/sample

Administrator@2NIJJZIFGF14CRQ MINGW32 /f/worksp/sample (master)
$ git tag -a "Release_1_0" -m "Tagged basic string operation code" HEAD如果要标记特定提交,则使用COMMIT ID而不是HEAD指针。使用以下命令将标签推送到远程存储库:
$ git push origin tag Release_1_0
Username for 'https://github.com': ivanzz1001
Counting objects: 1, done.
Writing objects: 100% (1/1), 180 bytes | 0 bytes/s, done.
Total 1 (delta 0), reused 0 (delta 0)
To https://github.com/ivanzz1001/sample.git
 * [new tag]         Release_1_0 -> Release_1_0
2) 查看标签
假设开发人员(maxsu)创建了标签。现在,另外一个开发人员(minsu)就可以使用带-l选项的git tag命令查看所有可用的标签:
$ pwd
/f/worksp/sample

Administrator@2NIJJZIFGF14CRQ MINGW32 /f/worksp/sample (master)
$ git pull
Already up-to-date.

Administrator@2NIJJZIFGF14CRQ MINGW32 /f/worksp/sample (master)
$ git tag -l
Release_1_0可使用git show命令后跟其标签名来查看有关标签的更多详细信息:
$ git show Release_1_0
tag Release_1_0
Tagger: ivanzz1001 <782740456@qq.com>
Date:   Sun Jun 16 22:12:35 2019 +0800

Tagged basic string operation code

commit e8c14b2341c2787741e859591154a92e601cd54e
Author: ivanzz1001 <782740456@qq.com>
Date:   Sun Jun 16 17:54:39 2019 +0800

    add module.py

diff --git a/src/module.py b/src/module.py
new file mode 100644
index 0000000..20d8471
--- /dev/null
+++ b/src/module.py
@@ -0,0 +1,16 @@
+#!/usr/bin/python3
+#coding=utf-8
+
+print ("Life is short, you need Python !")
+
+a = 10
+b = 20
+
+def mul(a, b)
+   return (a*b)
+
+def sum(a, b)
+   return (a+b)
+
+c = sum(a, b)
+print("The value of c is ", c)
\ No newline at end of file
3) 删除标签
使用以下命令从本地及远程存储库中删除标签,注意使用git tag -d中带有-d选项:
$ git tag
Release_1_0

Administrator@2NIJJZIFGF14CRQ MINGW32 /f/worksp/sample (master)
$ git tag -d Release_1_0
Deleted tag 'Release_1_0' (was 1765dcc)

Administrator@2NIJJZIFGF14CRQ MINGW32 /f/worksp/sample (master)
$ git push origin :Release_1_0
Username for 'https://github.com': ivanzz1001
To https://github.com/ivanzz1001/sample.git
 - [deleted]         Release_1_0
13. Git补丁操作
补丁是一个文本文件,其内容类似于git diff,但与代码一样,它也有关于提交的元数据。例如提交ID、日期、提交消息等。我们可以从提交创建一个补丁,而其他人可以将它们应用到他们的存储库。
假设我们在项目中实现了一个strcat函数。并将编写的代码的路径发送给其他开发人员。然后,其他开发人员可以将接收的补丁应用到自己的代码中。
我们使用git format-patch命令创建最新提交的修补程序。如果要为特定提交创建修补程序,请在format-patch命令后面指定COMMIT_ID。
$ pwd
/f/worksp/sample

Administrator@ZHANGYW6668 MINGW64 /f/worksp/sample (master)
$ git status
On branch master
Your branch is up-to-date with 'origin/master'.
Changes not staged for commit:
  (use "git add <file>..." to update what will be committed)
  (use "git checkout -- <file>..." to discard changes in working directory)

        modified:   src/module.py
        modified:   src/string.py

no changes added to commit (use "git add" and/or "git commit -a")

Administrator@ZHANGYW6668 MINGW64 /f/worksp/sample (master)
$ git add src/

Administrator@ZHANGYW6668 MINGW64 /f/worksp/sample (master)
$ git commit -m "Added my_strcat function"
[master 97c15f5] Added my_strcat function
 2 files changed, 7 insertions(+), 3 deletions(-)

Administrator@ZHANGYW6668 MINGW64 /f/worksp/sample (master)
$ git format-patch -1
0001-Added-my_strcat-function.patch上述命令在当前工作目录中创建.patch文件。其他开发人员可以使用这个补丁来修改他的文件。Git分别提供两个命令git am和git apply来应用补丁。git apply修改本地文件而不创建提交, 而git am会修改本地文件并创建提交。
要应用补丁,请使用以下命令:
$ git clone https://github.com/ivanzz1001/sample.git patch-sample
Cloning into 'patch-sample'...
remote: Enumerating objects: 30, done.
remote: Counting objects: 100% (30/30), done.
remote: Compressing objects: 100% (23/23), done.
remote: Total 30 (delta 4), reused 26 (delta 2), pack-reused 0
Unpacking objects: 100% (30/30), done.
Checking connectivity... done.

Administrator@ZHANGYW6668 MINGW64 /f/worksp
$ cd patch-sample/

Administrator@ZHANGYW6668 MINGW64 /f/worksp/patch-sample (master)
$ git diff

Administrator@ZHANGYW6668 MINGW64 /f/worksp/patch-sample (master)
$ git status -s

Administrator@ZHANGYW6668 MINGW64 /f/worksp/patch-sample (master)
$ git apply ../sample/0001-Added-my_strcat-function.patch

Administrator@ZHANGYW6668 MINGW64 /f/worksp/patch-sample (master)
$ git status -s
 M src/module.py
M src/string.py修补程序成功应用,现在我们可以使用git diff命令查看修改:
$ git diff
diff --git a/src/module.py b/src/module.py
index 20d8471..a033fe8 100644
--- a/src/module.py
+++ b/src/module.py
@@ -6,10 +6,10 @@ print ("Life is short, you need Python !")
 a = 10
 b = 20

-def mul(a, b)
+def mul(a, b):
    return (a*b)

-def sum(a, b)
+def sum(a, b):
    return (a+b)

 c = sum(a, b)
diff --git a/src/string.py b/src/string.py
index 1c719ca..378baf9 100644
--- a/src/string.py
+++ b/src/string.py
@@ -1,7 +1,11 @@
 #!/usr/bin/python3
+#coding=utf-8
+
+def my_strcat(str1, str2):
+    return (str1 + str2)

 var1 = 'Hello World!'
 var2 = "Python Programming"

 print ("var1[0]: ", var1[0])
-print ("var2[1:5]: ", var2[1:5]) # <C7><D0>Ƭ<BC><D3><CB><F7><D2><FD>
\ No newline at end of file
+print ("var2[1:5]: ", var2[1:5]) #
\ No newline at end of file
14. Git管理分支
分支操作允许创建另一路线/方向上开发。我们可以使用这个操作将开发过程分为两个不同的方向。例如,我们发布了1.0版本的产品,可能需要创建一个分支,以便将2.0功能的开发与1.0版本中错误修复分开。
1) 创建分支
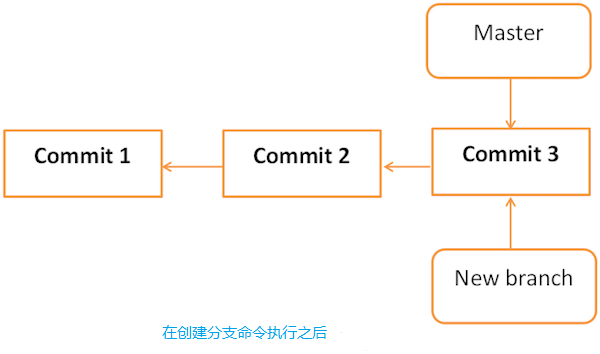
我们可以使用git branch <branch_name>命令创建一个新的分支。可以从现有的分支创建一个新的分支,也可以使用特定的提交或标签作为起点创建分支。如果没有提供任何特定的提交ID,那么将以HEAD作为起点来创建分支。参考如下代码,创建一个分支 new_branch:
$ git branch new_branch

Administrator@ZHANGYW6668 MINGW64 /f/worksp/sample (master)
$ git branch
* master
new_branch执行上述命令后,它创建了一个新的分支new_branch; 使用git branch命令列出可用的分支。Git会在当前签出分支之前显示一个星号。
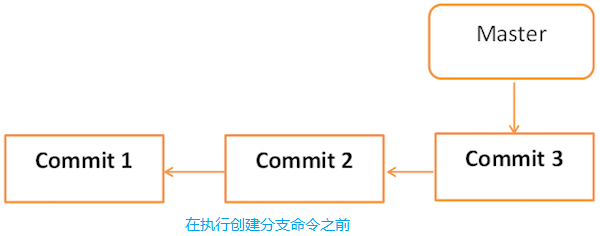
创建分支操作的图示表示如下:
2) 切换分支
使用git checkout命令在分支之间切换:
$ git checkout new_branch
Switched to branch 'new_branch'
3) 创建和切换分支的快捷方式
在上面的例子中,分别使用两个命令创建和切换分支。Git为checkout命令提供-b选项,此操作将创建一个新的分支,并立即切换到新分支:
$ git checkout -b test_branch
Switched to a new branch 'test_branch'

Administrator@ZHANGYW6668 MINGW64 /f/worksp/sample (test_branch)
$ git branch
  master
  new_branch
* test_branch
4) 删除本地分支
删除本地分支可以使用如下命令(注意: 删除分支之前,请切换到其他分支):
- 非强制删除分支
非强制删除分支采用-d选项。当test_branch分支上提交的内容未合并到master分支上时,删除test_branch分支时会报错,需要先合并分支才能删除。
$ git branch
  master
  new_branch
* test_branch

Administrator@ZHANGYW6668 MINGW64 /f/worksp/sample (test_branch)
$ git checkout master
Switched to branch 'master'
Your branch is ahead of 'origin/master' by 1 commit.
  (use "git push" to publish your local commits)

Administrator@ZHANGYW6668 MINGW64 /f/worksp/sample (master)
$ git branch -d test_branch
Deleted branch test_branch (was 97c15f5).- 强制删除分支
强制删除分支采用-D选项。当test_branch分支上提交的内容未合并到master分支上时,能强制删除test_branch分支,只会丢失test_branch提交的且未合并到master分支上的内容。
$ git branch
  master
  new_branch
* test_branch

Administrator@ZHANGYW6668 MINGW64 /f/worksp/sample (test_branch)
$ git checkout master
Switched to branch 'master'
Your branch is ahead of 'origin/master' by 1 commit.
  (use "git push" to publish your local commits)

Administrator@ZHANGYW6668 MINGW64 /f/worksp/sample (master)
$ git branch -D test_branch
Deleted branch test_branch (was 97c15f5).
当前剩下的分支如下:
$ git branch
* master
  new_branch
5) 重命名分支
假设需要在项目中添加对宽字符的支持,并且已经创建了一个新的分支,但分支名称需要重新命名。那么可通过使用-m选项后跟旧的分支名称和新的分支名称来更改/重命名分支名称。
$ git branch
* master
  new_branch

Administrator@ZHANGYW6668 MINGW64 /f/worksp/sample (master)
$ git branch -m new_branch wchar_support现在,使用git branch命令显示新的分支名称:
$ git branch
* master
  wchar_support
6) 查看远程分支
我们可以使用git branch -a来查看远程分支,远程分支会用红色标示出来:
$ git branch -a
* master
  wchar_support
  remotes/origin/HEAD -> origin/master
  remotes/origin/master
7) 提交分支到远程仓库
我们可以使用如下命令将本地新创建的分支推送到远程仓库:
$ git push origin wchar_support
Username for 'https://github.com': ivanzz1001
Password for 'https://ivanzz1001@github.com':
Total 0 (delta 0), reused 0 (delta 0)
remote:
remote: Create a pull request for 'wchar_support' on GitHub by visiting:
remote:      https://github.com/ivanzz1001/sample/pull/new/wchar_support
remote:
To https://github.com/ivanzz1001/sample.git
 * [new branch]      wchar_support -> wchar_support
8) 删除远程分支
不同版本的Git在操作起来有些不一样。首先查看本地Git版本:
$ git --version
git version 2.5.1.windows.1
- 在Git v1.7.0之前
删除远程分支(推送一个空分支到远程分支,其实相当于删除远程分支):
$ git push origin :wchar_support
Username for 'https://github.com': ivanzz1001
Password for 'https://ivanzz1001@github.com':
To https://github.com/ivanzz1001/sample.git
 - [deleted]         wchar_support
删除远程tag(推送一个空的tag到远程tag,其实相当于删除远程tag)
git tag -d <tagname>
git push origin :refs/tags/<tagname>- 在Git v1.7.0之后
我们可以使用如下命令删除远程分支:
$ git push origin --delete wchar_support
Username for 'https://github.com': ivanzz1001
Password for 'https://ivanzz1001@github.com':
To https://github.com/ivanzz1001/sample.git
- [deleted] wchar_support其实基于软件的向前兼容性,后续版本的Git仍支持v1.7.0之前的删除方式。
9) 重命名远程分支
在Git中重命名远程分支,其实就是先删除远程分支,然后重命名本地分支,再重新提交一个远程分支。
10) 合并两个分支
实现一个函数来返回字符串长度。新的代码显示如下:
#!/usr/bin/python3
#coding=utf-8

def my_strcat(str1, str2):
    return (str1 + str2)

var1 = 'Hello World!'
var2 = "Python Programming"

print ("var1[0]: ", var1[0])
print ("var2[1:5]: ", var2[1:5]) #

a='我'
b='ab'

ab='我ab'
print (len(a), len(b), len(ab), len('='))
查看当前分支状态:
$ git status
On branch wchar_support
Changes not staged for commit:
  (use "git add <file>..." to update what will be committed)
  (use "git checkout -- <file>..." to discard changes in working directory)

        modified:   src/string.py

no changes added to commit (use "git add" and/or "git commit -a")
假设经过测试,代码没有问题,最后将其变更推送到新分支:
$ git add src/string.py

Administrator@ZHANGYW6668 MINGW64 /f/worksp/sample (wchar_support)
$ git commit -m "Added w_strlen function to return string length of wchar_t string"
[wchar_support 5a6de96] Added w_strlen function to return string length of wchar_t string
1 file changed, 7 insertions(+), 1 deletion(-)请注意,下面将把这些更改推送到新的分支,所以这里使用的分支名称为wchar_support而不是master。执行过程及结果如下所示:
$ git push origin wchar_support
Username for 'https://github.com': ivanzz1001
Password for 'https://ivanzz1001@github.com':
Counting objects: 4, done.
Delta compression using up to 8 threads.
Compressing objects: 100% (4/4), done.
Writing objects: 100% (4/4), 460 bytes | 0 bytes/s, done.
Total 4 (delta 1), reused 0 (delta 0)
remote: Resolving deltas: 100% (1/1), completed with 1 local object.
remote:
remote: Create a pull request for 'wchar_support' on GitHub by visiting:
remote:      https://github.com/ivanzz1001/sample/pull/new/wchar_support
remote:
To https://github.com/ivanzz1001/sample.git
 * [new branch]      wchar_support -> wchar_support
提交更改后,新分支将显示如下:
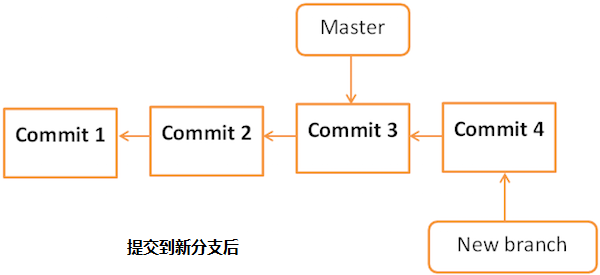
如果其他开发人员很想知道,我们在私人分支上做了什么,那么可从wchar_support分支检查日志:
$ git log origin/wchar_support -2
commit 5a6de967c14187af715375f9e1dcbd08a9b120b4
Author: ivanzz1001 <1181891136@qq.com>
Date:   Mon Jun 17 14:10:58 2019 +0800

    Added w_strlen function to return string length of wchar_t string

commit 97c15f5a7680e81dca0e91c88fa32ef529ef57c9
Author: ivanzz1001 <1181891136@qq.com>
Date:   Mon Jun 17 10:20:11 2019 +0800

Added my_strcat function通过查看提交消息,其他开发人员(minsu)看到有一个宽字符的相关计算函数,他希望在master分支中也要有相同的功能。不用重新执行代码编写,而是通过将分支与主分支合并来执行代码的合并。下面来看看应该怎么做?
$ git branch
* master
  wchar_support

Administrator@ZHANGYW6668 MINGW64 /f/worksp/sample (master)
$ pwd
/f/worksp/sample

Administrator@ZHANGYW6668 MINGW64 /f/worksp/sample (master)
$ git merge origin/wchar_support
Updating 97c15f5..5a6de96
Fast-forward
 src/string.py | 8 +++++++-
1 file changed, 7 insertions(+), 1 deletion(-)合并操作后,master分支显示如下:
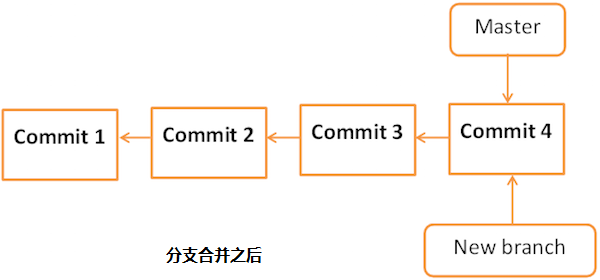
现在,分支wchar_support已经和master分支合并了。可以通过查看提交消息或者通过查看string.py文件中的修改来验证它:
$ git branch
* master
  wchar_support

Administrator@ZHANGYW6668 MINGW64 /f/worksp/sample (master)
$ git log -2
commit 5a6de967c14187af715375f9e1dcbd08a9b120b4
Author: ivanzz1001 <1181891136@qq.com>
Date:   Mon Jun 17 14:10:58 2019 +0800

    Added w_strlen function to return string length of wchar_t string

commit 97c15f5a7680e81dca0e91c88fa32ef529ef57c9
Author: ivanzz1001 <1181891136@qq.com>
Date:   Mon Jun 17 10:20:11 2019 +0800

    Added my_strcat function
上述命令产生以下结果:
$ cat src/string.py
#!/usr/bin/python3
#coding=utf-8

def my_strcat(str1, str2):
    return (str1 + str2)

var1 = 'Hello World!'
var2 = "Python Programming"

print ("var1[0]: ", var1[0])
print ("var2[1:5]: ", var2[1:5]) #

a='我'
b='ab'

ab='我ab'
print (len(a), len(b), len(ab), len('='))测试后,就可以将代码更改推送到master分支了。
$ git push origin master
Username for 'https://github.com': ivanzz1001
Password for 'https://ivanzz1001@github.com':
Total 0 (delta 0), reused 0 (delta 0)
To https://github.com/ivanzz1001/sample.git
   e8c14b2..5a6de96  master -> master
15. Git处理冲突
假设要在wchar_support分支中执行更改,修改wchar_support分支中的代码。添加一个计算长度的函数count_len(obj),代码变如下:
#!/usr/bin/python3
#coding=utf-8

def my_strcat(str1, str2):
    return (str1 + str2)

var1 = 'Hello World!'
var2 = "Python Programming"

print ("var1[0]: ", var1[0])
print ("var2[1:5]: ", var2[1:5]) #

a='我'
b='ab'

ab='我ab'
print (len(a), len(b), len(ab), len('='))

def count_len(obj):
    return len(obj)
假设验证代码后,没问题就提交这些更改:
$ git status
On branch wchar_support
Changes not staged for commit:
  (use "git add <file>..." to update what will be committed)
  (use "git checkout -- <file>..." to discard changes in working directory)

        modified:   src/string.py

no changes added to commit (use "git add" and/or "git commit -a")

Administrator@ZHANGYW6668 MINGW64 /f/worksp/sample (wchar_support)
$ git add src/string.py

Administrator@ZHANGYW6668 MINGW64 /f/worksp/sample (wchar_support)
$ git commit -m "add new function: count_len(obj)"
[wchar_support 954bdfd] add new function: count_len(obj)
 1 file changed, 4 insertions(+), 1 deletion(-)
1) 执行master分支变更
于此同时,在master分支中,另外一个开发人员(minsu)也更改了内容,在里面实现了一个obj_len(obj)函数,如下所示:
#!/usr/bin/python3
#coding=utf-8

def my_strcat(str1, str2):
    return (str1 + str2)

var1 = 'Hello World!'
var2 = "Python Programming"

print ("var1[0]: ", var1[0])
print ("var2[1:5]: ", var2[1:5]) #

a='我'
b='ab'

ab='我ab'
print (len(a), len(b), len(ab), len('='))

def obj_len(obj):
    return len(obj)
测试验证通过后,现在就提交更新内容:
$ git status
On branch master
Your branch is up-to-date with 'origin/master'.
Changes not staged for commit:
  (use "git add <file>..." to update what will be committed)
  (use "git checkout -- <file>..." to discard changes in working directory)

        modified:   src/string.py

no changes added to commit (use "git add" and/or "git commit -a")

Administrator@ZHANGYW6668 MINGW64 /f/worksp/sample (master)
$ git add src/string.py

Administrator@ZHANGYW6668 MINGW64 /f/worksp/sample (master)
$ git commit -m "add a new function obj_len(obj)"
[master 77c07b9] add a new function obj_len(obj)
 1 file changed, 4 insertions(+), 1 deletion(-)

Administrator@ZHANGYW6668 MINGW64 /f/worksp/sample (master)
$ git push origin master
Username for 'https://github.com': ivanzz1001
Password for 'https://ivanzz1001@github.com':
Counting objects: 4, done.
Delta compression using up to 8 threads.
Compressing objects: 100% (4/4), done.
Writing objects: 100% (4/4), 422 bytes | 0 bytes/s, done.
Total 4 (delta 1), reused 0 (delta 0)
remote: Resolving deltas: 100% (1/1), completed with 1 local object.
To https://github.com/ivanzz1001/sample.git
5a6de96..77c07b9 master -> master同时在wchar_support分支上,我们已经实现了一个count_len(obj)函数。假设经过测试后,提交并将其更改推送到wchar_support分支。
2) 出现冲突
假设另外一个开发人员(minsu)想看看我们在wchar_support分支上做了什么,他试图从wchar_support分支中拉出最新的变化,但是Git会中断这个操作,并显示以下错误消息:
$ git branch
* master
  wchar_support

Administrator@ZHANGYW6668 MINGW64 /f/worksp/sample (master)
$ git pull origin wchar_support
From https://github.com/ivanzz1001/sample
 * branch            wchar_support -> FETCH_HEAD
Auto-merging src/string.py
CONFLICT (content): Merge conflict in src/string.py
Automatic merge failed; fix conflicts and then commit the result.
3) 解决冲突
从错误消息中,很明显文件src/string.py中存在冲突。运行git diff命令查看更多细节:
$ git diff
diff --cc src/string.py
index a85690f,5a8bed6..0000000
--- a/src/string.py
+++ b/src/string.py
@@@ -16,5 -16,5 +16,9 @@@ b='ab
  ab='我ab'
  print (len(a), len(b), len(ab), len('='))

++<<<<<<< HEAD
 +def obj_len(obj):
++=======
+ def count_len(obj):
++>>>>>>> 954bdfd9f60af3e3ccab9b57d9cb4e8c771c2cc1
return len(obj)由于两个人同时修改了string.py中的代码,所以Git出于混乱状态,并且要求用户手动解决冲突。结社maxsu决定保留修改的代码,并删除自己定义的函数obj_len(obj)。删除冲突标记后,如下所示:
$ git diff
diff --cc src/string.py
index a85690f,5a8bed6..0000000
--- a/src/string.py
+++ b/src/string.py
@@@ -16,5 -16,5 +16,6 @@@ b='ab
  ab='我ab'
  print (len(a), len(b), len(ab), len('='))

- def obj_len(obj):
++
+ def count_len(obj):
return len(obj)由于minsu已经修改了这些文件,所以必须首先提交这些修改:
$ git add .

Administrator@ZHANGYW6668 MINGW64 /f/worksp/sample (master|MERGING)
$ git commit -m "Resolved conflict"
[master d4d8f8a] Resolved conflict

Administrator@ZHANGYW6668 MINGW64 /f/worksp/sample (master)
$ git pull origin wchar_support
From https://github.com/ivanzz1001/sample
 * branch            wchar_support -> FETCH_HEAD
Already up-to-date.已经解决了冲突,现在执行git pull应该就没问题了。
16. Git不同平台换行符问题
GNU/Linux和Mac OS使用换行符(LF)作为行结束字符,而Windows使用回车和换行(CRLF)组合来表示行结束字符。
我了避免这些行结尾的差异的不必要提交,我们必须配置Git客户端写入与Git仓库使用相同的行结束符。
对于Windows系统,可以将Git客户端配置为将行结束符转换为CRLF格式,而在进行提交操作时将其转换会LF格式。以下根据您的需要来设置:
$ git config --global core.autocrlf true
17. Git远程操作详解
Git是目前最流行的版本管理系统,学会Git几乎成了开发者的必备技能。
Git有很多优势,其中之一就是远程操作非常简便。本文详细介绍5个Git命令,它们的概念和用法,理解了这些内容, 你就会完全掌握Git远程操作:
-
git clone
-
git remote
-
git fetch
-
git pull
-
git push
本文针对初级用户,从最简单的讲起,但是需要读者对Git的基本用法有所了解。同时,本文覆盖了上面5个命令的几乎所有的常用用法,所以对于熟练用户也有参考价值。

[参看]
