MySQL数据库备份与恢复实战
本章首先讲述一下数据库的导入与导出,然后再通过相应的示例讲述一下MySQL数据库的备份。当前SQL版本为:
mysql> status;
--------------
mysql  Ver 14.14 Distrib 5.7.22, for Linux (x86_64) using  EditLine wrapper
1. MySQL 数据备份
MySQL数据的备份类型根据自身的特性主要分为以下几组:
-
完全备份: 是备份整个数据集(即整个数据库)
-
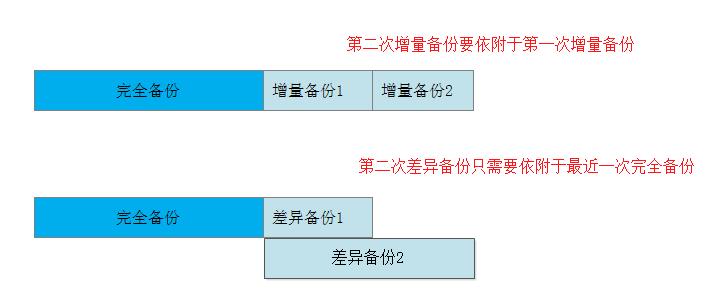
部分备份: 备份部分数据集(例如,只备份一个表)。而部分备份又可以分为
增量备份和差异备份。
增量备份: 备份自上一次备份以来(增量或完全)变化的数据。 优点是节约空间,但是还原较为麻烦

差异备份: 备份自上一次完全备份以来变化的数据。优点是还原比增量备份简单,缺点是浪费空间。
1.1 MySQL备份数据的方式
在MySQL中我们备份数据一般有几种方式:
-
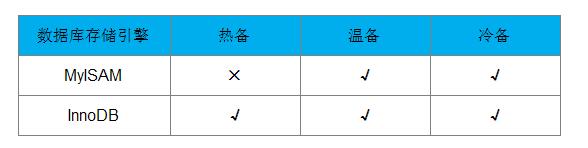
热备份: 指的是当数据库进行备份时,数据库的读写操作均不受影响;
-
温备份: 指的是当数据库进行备份时,数据库的读操作可以执行,但不能执行写操作;
-
冷备份; 指的是当数据库进行备份时,数据库不能进行读、写操作,即数据库要下线;
MySQL中进行不同方式的备份还需要考虑存储引擎是否支持:
我们在考虑数据备份时,除了数据库的运行状态之外,还需要考虑对于MySQL数据库中数据的备份方式:
-
物理备份: 一般就是通过
tar、cp等命令直接打包复制数据库的数据文件以达到备份的效果; -
逻辑备份: 通过特定工具从数据库中导出数据并另存备份(逻辑备份会丢失数据精度)。
1.2 备份需要考虑的问题
定制备份策略前,我们还需要考虑一些问题:
我们要备份什么?
一般情况下,我们需要备份的数据分为以下几种:
-
数据
-
二进制日志、InnoDB事务日志
-
代码(存储过程、存储函数、触发器、事件调度器)
-
服务器配置文件
备份工具
这里我们例举出常用的几种备份工具:
mysqldump: 逻辑备份工具、适用于所有的存储引擎,支持温备份、完全备份、部分备份, 对于InnoDB存储存储引擎支持热备份;

cp、tar等归档复制工具: 物理备份工具,适用于所有的存储引擎,冷备份、完全备份、部分备份

lvm2 snapshot: 近乎热备,借助文件系统管理工具进行备份

mysqlhotcopy: 名不副实的一个工具,几乎冷备,仅支持MyISAM存储引擎

xtrabackup: 一款非常强大的InnoDB/XtraDB热备工具,支持完全备份、增量备份,由percona提供
2. 实战演练
这里我们介绍两种:
-
物理全量备份 + 增量备份
-
逻辑全量备份 + 增量备份
2.1 物理全量备份 + 增量备份
我们当前数据库状态:
mysql> show databases;
+--------------------+
| Database           |
+--------------------+
| information_schema |
| app                |
| mysql              |
| performance_schema |
| sys                |
| test               |
+--------------------+
6 rows in set (0.01 sec)

mysql> use test;
Database changed
mysql> show tables;
+----------------+
| Tables_in_test |
+----------------+
| course         |
| runoob_tbl     |
| student        |
+----------------+
3 rows in set (0.00 sec)
并且当前我们已经开启了binlog日志:
mysql> SHOW VARIABLES LIKE 'sql_log_bin';
+---------------+-------+
| Variable_name | Value |
+---------------+-------+
| sql_log_bin   | ON    |
+---------------+-------+
1 row in set (0.00 sec)
1) 向数据库施加读锁
mysql> FLUSH TABLES WITH READ LOCK;
Query OK, 0 rows affected (0.00 sec)
2) 记录下当前binlog日志
mysql> SHOW MASTER STATUS;
+----------------------+----------+--------------+------------------+-------------------+
| File                 | Position | Binlog_Do_DB | Binlog_Ignore_DB | Executed_Gtid_Set |
+----------------------+----------+--------------+------------------+-------------------+
| master-logbin.000005 |     4713 |              |                  |                   |
+----------------------+----------+--------------+------------------+-------------------+
1 row in set (0.00 sec)
3) 拷贝数据库文件做全量备份
# mkdir full_bakup
# ls /var/lib/mysql/
app/                  client-cert.pem       ib_logfile0           master-logbin.000002  master-logbin.index   performance_schema/   server-key.pem
auto.cnf              client-key.pem        ib_logfile1           master-logbin.000003  mysql/                private_key.pem       sys/
ca-key.pem            ib_buffer_pool        ibtmp1                master-logbin.000004  mysql.sock            public_key.pem        test/
ca.pem                ibdata1               master-logbin.000001  master-logbin.000005  mysql.sock.lock       server-cert.pem
# cp -ar /var/lib/mysql/* ./full_bakup/
# tar -zcvf full_bakup.tar.gz ./full_bakup
4) 修改数据,做增量备份
首先在上面执行FLUSH TABLES WITH READ LOCK的session中执行如下命令以解锁数据库:
mysql> unlock table;
Query OK, 0 rows affected (0.00 sec)然后新创建一个数据库及表,并向表中插入一些数据:
mysql> CREATE DATABASE test2;
mysql> use test2;

mysql> CREATE TABLE person(
    ->  id INT(11) PRIMARY KEY AUTO_INCREMENT,
    ->  name char(64) NOT NULL,
    ->  age int
    -> )ENGINE=InnoDB DEFAULT CHARSET=utf8;
Query OK, 0 rows affected (0.02 sec)

mysql> INSERT INTO person(name,age) VALUES("ivan1001",20);
Query OK, 1 row affected (0.01 sec)

mysql> INSERT INTO person(name, age) VALUES("scarllet",18);
Query OK, 1 row affected (0.00 sec)

mysql> select * from person;
+----+----------+------+
| id | name     | age  |
+----+----------+------+
|  1 | ivan1001 |   20 |
|  2 | scarllet |   18 |
+----+----------+------+
2 rows in set (0.01 sec)
接着再获取增量备份日志:
mysql> FLUSH TABLES WITH READ LOCK;
Query OK, 0 rows affected (0.00 sec)

mysql> SHOW MASTER STATUS;
+----------------------+----------+--------------+------------------+-------------------+
| File                 | Position | Binlog_Do_DB | Binlog_Ignore_DB | Executed_Gtid_Set |
+----------------------+----------+--------------+------------------+-------------------+
| master-logbin.000005 |     5698 |              |                  |                   |
+----------------------+----------+--------------+------------------+-------------------+
1 row in set (0.00 sec)结合上次我们做的全量备份,当前我们只需要再备份master-logbin.000005这个文件即可:
# mkdir increment_bakup
# cp /var/lib/mysql/master-logbin.000005 increment_bakup/
# tar -zcvf increment_bakup.tar.gz ./increment_bakup
5) 停止数据库,并删除mysql数据目录
我们通过如下方式来模拟数据丢失:
# mysqladmin -uroot -ptestAa@123 shutdown
# rm -rf /var/lib/mysql/*
6) 重新启动MySQL
# systemctl start mysqld
# systemctl status mysqld
● mysqld.service - MySQL Server
   Loaded: loaded (/usr/lib/systemd/system/mysqld.service; enabled; vendor preset: disabled)
   Active: active (running) since Fri 2018-10-26 14:12:21 CST; 11s ago
     Docs: man:mysqld(8)
           http://dev.mysql.com/doc/refman/en/using-systemd.html
  Process: 97944 ExecStart=/usr/sbin/mysqld --daemonize --pid-file=/var/run/mysqld/mysqld.pid $MYSQLD_OPTS (code=exited, status=0/SUCCESS)
  Process: 97863 ExecStartPre=/usr/bin/mysqld_pre_systemd (code=exited, status=0/SUCCESS)
 Main PID: 97947 (mysqld)
   Memory: 318.9M
   CGroup: /system.slice/mysqld.service
           └─97947 /usr/sbin/mysqld --daemonize --pid-file=/var/run/mysqld/mysqld.pid

Oct 26 14:12:16 bogon mysqld_pre_systemd[97863]: Full path required for exclude: net:[4026533235].
Oct 26 14:12:16 bogon mysqld_pre_systemd[97863]: Full path required for exclude: net:[4026533331].
Oct 26 14:12:17 bogon mysqld_pre_systemd[97863]: Full path required for exclude: net:[4026532659].
Oct 26 14:12:17 bogon mysqld_pre_systemd[97863]: Full path required for exclude: net:[4026533043].
Oct 26 14:12:17 bogon mysqld_pre_systemd[97863]: Full path required for exclude: net:[4026532851].
Oct 26 14:12:17 bogon mysqld_pre_systemd[97863]: Full path required for exclude: net:[4026532947].
Oct 26 14:12:17 bogon mysqld_pre_systemd[97863]: Full path required for exclude: net:[4026533139].
Oct 26 14:12:17 bogon mysqld_pre_systemd[97863]: Full path required for exclude: net:[4026533235].
Oct 26 14:12:17 bogon mysqld_pre_systemd[97863]: Full path required for exclude: net:[4026533331].
Oct 26 14:12:21 bogon systemd[1]: Started MySQL Server.
[root@bogon mysql-test]# netstat -nlp | grep mysql
tcp6       0      0 :::3306                 :::*                    LISTEN      97947/mysqld
unix  2      [ ACC ]     STREAM     LISTENING     7821746  97947/mysqld         /var/lib/mysql/mysql.sock
注: 重启MySQL时, 如果是编译安装的应该不能启动, 如果rpm安装则会重新初始化数据库
接下来我们登录数据库查看一下:
# mysql -uroot -ptestAa@123
mysql: [Warning] Using a password on the command line interface can be insecure.
ERROR 1045 (28000): Access denied for user 'root'@'localhost' (using password: YES)
我们看到因为所有数据都已经丢失,我们目前已经无法登录数据库了。本次MySQL数据库启动,是MySQL重新初始化的数据库,可以通过如下方式找到初始登录密码:
# grep "password" /var/log/mysqld.log
2018-10-26T06:12:18.237980Z 1 [Note] A temporary password is generated for root@localhost: N=1MH/_yJkB2
2018-10-26T06:16:39.369163Z 2 [Note] Access denied for user 'root'@'localhost' (using password: YES)
因此如下我们先使用该密码以登录查看:
# mysql -uroot -pN=1MH/_yJkB2

//登录后必须首先修改密码才能再进行操作
mysql> show databases;
ERROR 1820 (HY000): You must reset your password using ALTER USER statement before executing this statement.
mysql> ALTER USER 'root'@'localhost' IDENTIFIED BY 'testAa@123';
Query OK, 0 rows affected (0.00 sec)

mysql> flush privileges;
Query OK, 0 rows affected (0.01 sec)


mysql> show databases;
+--------------------+
| Database           |
+--------------------+
| information_schema |
| mysql              |
| performance_schema |
| sys                |
+--------------------+
4 rows in set (0.00 sec)
上面我们看到原来的数据全部丢失了。
7) 全量数据恢复
首先使用上述创建的全量备份,来进行全量恢复(其实我们可以不用上面步骤6的操作):
# mysqld -uroot -ptestAa@123 shutdown
# tar -zxvf full_bakup.tar.gz
#
# mkdir -p /var/lib/mysql
# chown -R mysql:mysql /var/lib/mysql
# cp -ar full_bakup/* /var/lib/mysql/
# chown -R mysql:mysql /var/lib/mysql
接着重启mysql数据库:
# systemctl start mysqld
Job for mysqld.service failed because the control process exited with error code. See "systemctl status mysqld.service" and "journalctl -xe" for details.

# # journalctl -xe
--
-- Unit mysqld.service has failed.
--
-- The result is failed.
Oct 26 14:43:29 bogon systemd[1]: Unit mysqld.service entered failed state.
Oct 26 14:43:29 bogon systemd[1]: mysqld.service failed.
Oct 26 14:43:29 bogon setroubleshoot[110880]: SELinux is preventing /usr/sbin/mysqld from 'read, write' accesses on the file master-logbin.index. For complete SELinux mess
Oct 26 14:43:29 bogon python[110880]: SELinux is preventing /usr/sbin/mysqld from 'read, write' accesses on the file master-logbin.index.

                                      *****  Plugin catchall (100. confidence) suggests   **************************

                                      If you believe that mysqld should be allowed read write access on the master-logbin.index file by default.
                                      Then you should report this as a bug.
                                      You can generate a local policy module to allow this access.
                                      Do
                                      allow this access for now by executing:
                                      # ausearch -c 'mysqld' --raw | audit2allow -M my-mysqld
                                      # semodule -i my-mysqld.pp

Oct 26 14:43:29 bogon systemd[1]: mysqld.service holdoff time over, scheduling restart.
Oct 26 14:43:29 bogon systemd[1]: start request repeated too quickly for mysqld.service
Oct 26 14:43:29 bogon systemd[1]: Failed to start MySQL Server.
-- Subject: Unit mysqld.service has failed
-- Defined-By: systemd
-- Support: http://lists.freedesktop.org/mailman/listinfo/systemd-devel
--
-- Unit mysqld.service has failed.
--
-- The result is failed.
Oct 26 14:43:29 bogon systemd[1]: Unit mysqld.service entered failed state.
Oct 26 14:43:29 bogon systemd[1]: mysqld.service failed.
Oct 26 14:44:01 bogon systemd[1]: Started Session 3689 of user root.
上面基本上是由于访问权限引起的,这里我们可以有两种方法来进行处理:
- 关闭SeLinux
# setenforce 0
# getenforce
上面只是临时关闭SeLinux,如果要永久修改,则可以:
# cat /etc/selinux/config

# This file controls the state of SELinux on the system.
# SELINUX= can take one of these three values:
#     enforcing - SELinux security policy is enforced.
#     permissive - SELinux prints warnings instead of enforcing.
#     disabled - No SELinux policy is loaded.
SELINUX=enforcing
# SELINUXTYPE= can take one of three two values:
#     targeted - Targeted processes are protected,
#     minimum - Modification of targeted policy. Only selected processes are protected.
#     mls - Multi Level Security protection.
SELINUXTYPE=targeted
本方法关闭SeLinux虽然可行,但是不建议使用。
- 配置使得允许访问
/var/lib/mysql目录
# semanage fcontext --list | grep mysql
/etc/mysql(/.*)?                                   all files          system_u:object_r:mysqld_etc_t:s0
/etc/my\.cnf\.d(/.*)?                              all files          system_u:object_r:mysqld_etc_t:s0
/var/log/mysql.*                                   regular file       system_u:object_r:mysqld_log_t:s0
/var/lib/mysql(/.*)?                               all files          system_u:object_r:mysqld_db_t:s0
/var/run/mysqld(/.*)?                              all files          system_u:object_r:mysqld_var_run_t:s0
/var/log/mariadb(/.*)?                             all files          system_u:object_r:mysqld_log_t:s0
/var/run/mariadb(/.*)?                             all files          system_u:object_r:mysqld_var_run_t:s0
/usr/sbin/mysqld(-max)?                            regular file       system_u:object_r:mysqld_exec_t:s0
/var/run/mysqld/mysqlmanager.*                     regular file       system_u:object_r:mysqlmanagerd_var_run_t:s0
/usr/lib/systemd/system/mysqld.*                   regular file       system_u:object_r:mysqld_unit_file_t:s0
/usr/share/munin/plugins/mysql_.*                  regular file       system_u:object_r:services_munin_plugin_exec_t:s0
/usr/lib/systemd/system/mariadb.*                  regular file       system_u:object_r:mysqld_unit_file_t:s0
/etc/my\.cnf                                       regular file       system_u:object_r:mysqld_etc_t:s0
/root/\.my\.cnf                                    regular file       system_u:object_r:mysqld_home_t:s0
/usr/sbin/ndbd                                     regular file       system_u:object_r:mysqld_exec_t:s0
/usr/libexec/mysqld                                regular file       system_u:object_r:mysqld_exec_t:s0
/usr/bin/mysqld_safe                               regular file       system_u:object_r:mysqld_safe_exec_t:s0
/usr/bin/mysql_upgrade                             regular file       system_u:object_r:mysqld_exec_t:s0
/usr/sbin/mysqlmanager                             regular file       system_u:object_r:mysqlmanagerd_exec_t:s0
/etc/rc\.d/init\.d/mysqld                          regular file       system_u:object_r:mysqld_initrc_exec_t:s0
/var/lib/mysql/mysql\.sock                         socket             system_u:object_r:mysqld_var_run_t:s0
/usr/sbin/zabbix_proxy_mysql                       regular file       system_u:object_r:zabbix_exec_t:s0
/etc/rc\.d/init\.d/mysqlmanager                    regular file       system_u:object_r:mysqlmanagerd_initrc_exec_t:s0
/usr/sbin/zabbix_server_mysql                      regular file       system_u:object_r:zabbix_exec_t:s0
/usr/libexec/mysqld_safe-scl-helper                regular file       system_u:object_r:mysqld_safe_exec_t:s0
/usr/lib/nagios/plugins/check_mysql                regular file       system_u:object_r:nagios_services_plugin_exec_t:s0
/usr/lib/nagios/plugins/check_mysql_query          regular file       system_u:object_r:nagios_services_plugin_exec_t:s0
/var/lib/mysql-files = /var/lib/mysql
/var/lib/mysql-keyring = /var/lib/mysql

//因为上面已经存在mysqle_db_t,因此如下一条语句可以不用执行
# semanage fcontext -a -t mysqld_db_t "/var/lib/mysql(/.*)?"


# chcon -Rv -u system_u -r object_r -t mysqld_db_t /var/lib/mysql
# restorecon -Rv /var/lib/mysql/
# ls -Z /var/lib/mysql
drwxr-x---. mysql mysql system_u:object_r:mysqld_db_t:s0 app
-rw-r-----. mysql mysql system_u:object_r:mysqld_db_t:s0 auto.cnf
-rw-------. mysql mysql system_u:object_r:mysqld_db_t:s0 ca-key.pem
-rw-r--r--. mysql mysql system_u:object_r:mysqld_db_t:s0 ca.pem
-rw-r--r--. mysql mysql system_u:object_r:mysqld_db_t:s0 client-cert.pem
-rw-------. mysql mysql system_u:object_r:mysqld_db_t:s0 client-key.pem
-rw-r-----. mysql mysql system_u:object_r:mysqld_db_t:s0 ib_buffer_pool
-rw-r-----. mysql mysql system_u:object_r:mysqld_db_t:s0 ibdata1
-rw-r-----. mysql mysql system_u:object_r:mysqld_db_t:s0 ib_logfile0
-rw-r-----. mysql mysql system_u:object_r:mysqld_db_t:s0 ib_logfile1
-rw-r-----. mysql mysql system_u:object_r:mysqld_db_t:s0 ibtmp1
-rw-r-----. mysql mysql system_u:object_r:mysqld_db_t:s0 master-logbin.000001
-rw-r-----. mysql mysql system_u:object_r:mysqld_db_t:s0 master-logbin.000002
-rw-r-----. mysql mysql system_u:object_r:mysqld_db_t:s0 master-logbin.000003
-rw-r-----. mysql mysql system_u:object_r:mysqld_db_t:s0 master-logbin.000004
-rw-r-----. mysql mysql system_u:object_r:mysqld_db_t:s0 master-logbin.000005
-rw-r-----. mysql mysql system_u:object_r:mysqld_db_t:s0 master-logbin.000006
-rw-r-----. mysql mysql system_u:object_r:mysqld_db_t:s0 master-logbin.index
drwxr-x---. mysql mysql system_u:object_r:mysqld_db_t:s0 mysql
srwxrwxrwx. mysql mysql system_u:object_r:mysqld_var_run_t:s0 mysql.sock
-rw-------. mysql mysql system_u:object_r:mysqld_db_t:s0 mysql.sock.lock
drwxr-x---. mysql mysql system_u:object_r:mysqld_db_t:s0 performance_schema
-rw-------. mysql mysql system_u:object_r:mysqld_db_t:s0 private_key.pem
-rw-r--r--. mysql mysql system_u:object_r:mysqld_db_t:s0 public_key.pem
-rw-r--r--. mysql mysql system_u:object_r:mysqld_db_t:s0 server-cert.pem
-rw-------. mysql mysql system_u:object_r:mysqld_db_t:s0 server-key.pem
drwxr-x---. mysql mysql system_u:object_r:mysqld_db_t:s0 sys
drwxr-x---. mysql mysql system_u:object_r:mysqld_db_t:s0 test

//重启操作系统
# reboot


# ps -ef | grep mysql
root        891      1  0 16:34 ?        00:00:00 /bin/bash /usr/bin/mysqld_pre_systemd
root       2395    891 19 16:35 ?        00:00:00 /usr/bin/python -Es /usr/sbin/semanage fcontext -a -e /var/lib/mysql /var/lib/mysql-keyring
root       2413   2171  0 16:35 pts/0    00:00:00 grep --color=auto mysql


//登录MySQL
# mysql -uroot -ptestAa@123
mysql> show databases;
+--------------------+
| Database           |
+--------------------+
| information_schema |
| app                |
| mysql              |
| performance_schema |
| sys                |
| test               |
+--------------------+
上面我们看到已经完成了全量恢复。
8) 增量恢复
这里我们使用binlog来做增量恢复。上面我们备份了增量日志文件master-logbin.000005,并且知道了position。因此我们可以来进行增量恢复:
# mysqlbinlog --start-position=4713 --stop-position=5689 ./master-logbin.000005 | mysql -uroot -ptestAa@123
mysql: [Warning] Using a password on the command line interface can be insecure.
下面我们登录MySQL以检查是否恢复成功:
# mysql -uroot -ptestAa@123

mysql> show databases;
+--------------------+
| Database           |
+--------------------+
| information_schema |
| app                |
| mysql              |
| performance_schema |
| sys                |
| test               |
| test2              |
+--------------------+
7 rows in set (0.00 sec)

mysql> use test2;
Reading table information for completion of table and column names
You can turn off this feature to get a quicker startup with -A

Database changed
mysql> show tables;
+-----------------+
| Tables_in_test2 |
+-----------------+
| person          |
+-----------------+
1 row in set (0.00 sec)

mysql> select * from person;
+----+----------+------+
| id | name     | age  |
+----+----------+------+
|  1 | ivan1001 |   20 |
|  2 | scarllet |   18 |
+----+----------+------+
2 rows in set (0.00 sec)
2.2 逻辑全量备份+增量备份
我们当前数据库状态:
mysql> show databases;
+--------------------+
| Database           |
+--------------------+
| information_schema |
| app                |
| mysql              |
| performance_schema |
| sys                |
| test               |
+--------------------+
6 rows in set (0.01 sec)

mysql> use test;
Database changed
mysql> show tables;
+----------------+
| Tables_in_test |
+----------------+
| course         |
| runoob_tbl     |
| student        |
+----------------+
3 rows in set (0.00 sec)
并且当前我们已经开启了binlog日志:
mysql> SHOW VARIABLES LIKE 'sql_log_bin';
+---------------+-------+
| Variable_name | Value |
+---------------+-------+
| sql_log_bin   | ON    |
+---------------+-------+
1 row in set (0.00 sec)
1) 全量备份MySQL数据库
# ls /var/lib/mysql/
app/                  client-key.pem        ibtmp1                master-logbin.000005  mysql.sock.lock         server-key.pem
auto.cnf              ib_buffer_pool        master-logbin.000001  master-logbin.000006  performance_schema/     sys/
ca-key.pem            ibdata1               master-logbin.000002  master-logbin.index   private_key.pem         test/
ca.pem                ib_logfile0           master-logbin.000003  mysql/                public_key.pem
client-cert.pem       ib_logfile1           master-logbin.000004  mysql.sock            server-cert.pem

# mysqldump -uroot -ptestAa@123 --single-transaction --flush-logs --master-data=2 \
--all-databases > backup_sunday_1_PM.sql导出后,我们查看backup_sunday_1_PM.sql:
# more ./backup_sunday_1_PM.sql
-- MySQL dump 10.13  Distrib 5.7.22, for Linux (x86_64)
--
-- Host: localhost    Database:
-- ------------------------------------------------------
-- Server version       5.7.22-log

/*!40101 SET @OLD_CHARACTER_SET_CLIENT=@@CHARACTER_SET_CLIENT */;
/*!40101 SET @OLD_CHARACTER_SET_RESULTS=@@CHARACTER_SET_RESULTS */;
/*!40101 SET @OLD_COLLATION_CONNECTION=@@COLLATION_CONNECTION */;
/*!40101 SET NAMES utf8 */;
/*!40103 SET @OLD_TIME_ZONE=@@TIME_ZONE */;
/*!40103 SET TIME_ZONE='+00:00' */;
/*!40014 SET @OLD_UNIQUE_CHECKS=@@UNIQUE_CHECKS, UNIQUE_CHECKS=0 */;
/*!40014 SET @OLD_FOREIGN_KEY_CHECKS=@@FOREIGN_KEY_CHECKS, FOREIGN_KEY_CHECKS=0 */;
/*!40101 SET @OLD_SQL_MODE=@@SQL_MODE, SQL_MODE='NO_AUTO_VALUE_ON_ZERO' */;
/*!40111 SET @OLD_SQL_NOTES=@@SQL_NOTES, SQL_NOTES=0 */;

--
-- Position to start replication or point-in-time recovery from
--

-- CHANGE MASTER TO MASTER_LOG_FILE='master-logbin.000007', MASTER_LOG_POS=154;可以看到我们当前拷贝时的binlog偏移是master-logbin.000007, position=154。
然后我们再查看MySQL数据目录/var/lib/mysql:
# ls /var/lib/mysql
app         client-cert.pem  ib_logfile0           master-logbin.000002  master-logbin.000006  mysql.sock          public_key.pem   test
auto.cnf    client-key.pem   ib_logfile1           master-logbin.000003  master-logbin.000007  mysql.sock.lock     server-cert.pem
ca-key.pem  ib_buffer_pool   ibtmp1                master-logbin.000004  master-logbin.index   performance_schema  server-key.pem
ca.pem      ibdata1          master-logbin.000001  master-logbin.000005  mysql                 private_key.pem     sys
可以看到日志已经刷新到了master-logbin.000007。
2) 修改数据,进行增量备份
如下我们修改数据,并产生相应的日志来模拟增量备份:
mysql> CREATE DATABASE test2;
Query OK, 1 row affected (0.00 sec)

mysql> use test2;
Database changed
mysql> CREATE TABLE person(
    -> id INT(11) PRIMARY KEY AUTO_INCREMENT,
    -> name char(64) NOT NULL,
    -> age int
    -> )ENGINE=InnoDB DEFAULT CHARSET=utf8;
Query OK, 0 rows affected (0.02 sec)

mysql> INSERT INTO person(name,age) VALUES("ivan1001",20);
Query OK, 1 row affected (0.00 sec)

mysql> INSERT INTO person(name, age) VALUES("scarllet",18);
Query OK, 1 row affected (0.00 sec)
3) 增量备份
首先将表锁住,并获取到当前的日志偏移:
mysql> FLUSH TABLES WITH READ LOCK;
Query OK, 0 rows affected (0.00 sec)

mysql> SHOW MASTER STATUS;
+----------------------+----------+--------------+------------------+-------------------+
| File                 | Position | Binlog_Do_DB | Binlog_Ignore_DB | Executed_Gtid_Set |
+----------------------+----------+--------------+------------------+-------------------+
| master-logbin.000007 |     1136 |              |                  |                   |
+----------------------+----------+--------------+------------------+-------------------+
1 row in set (0.01 sec)
备份增量日志数据:
# cp /var/lib/mysql/master-logbin.000007 ./increment_bakup/
4) 停止MySQL,并模拟数据丢失
# mysqladmin -uroot -ptestAa@123 shutdown
# rm -rf /var/lib/mysql/*
5) 重新启动数据库
# systemctl start mysqld
# systemctl status mysqld
● mysqld.service - MySQL Server
   Loaded: loaded (/usr/lib/systemd/system/mysqld.service; enabled; vendor preset: disabled)
   Active: active (running) since Fri 2018-10-26 20:24:10 CST; 9s ago
     Docs: man:mysqld(8)
           http://dev.mysql.com/doc/refman/en/using-systemd.html
  Process: 61878 ExecStart=/usr/sbin/mysqld --daemonize --pid-file=/var/run/mysqld/mysqld.pid $MYSQLD_OPTS (code=exited, status=0/SUCCESS)
  Process: 61798 ExecStartPre=/usr/bin/mysqld_pre_systemd (code=exited, status=0/SUCCESS)
 Main PID: 61881 (mysqld)
   Memory: 320.3M
   CGroup: /system.slice/mysqld.service
           └─61881 /usr/sbin/mysqld --daemonize --pid-file=/var/run/mysqld/mysqld.pid

Oct 26 20:24:04 bogon mysqld_pre_systemd[61798]: Full path required for exclude: net:[4026533041].
Oct 26 20:24:04 bogon mysqld_pre_systemd[61798]: Full path required for exclude: net:[4026532849].
Oct 26 20:24:05 bogon mysqld_pre_systemd[61798]: Full path required for exclude: net:[4026532945].
Oct 26 20:24:05 bogon mysqld_pre_systemd[61798]: Full path required for exclude: net:[4026533137].
Oct 26 20:24:05 bogon mysqld_pre_systemd[61798]: Full path required for exclude: net:[4026532753].
Oct 26 20:24:05 bogon mysqld_pre_systemd[61798]: Full path required for exclude: net:[4026533329].
Oct 26 20:24:05 bogon mysqld_pre_systemd[61798]: Full path required for exclude: net:[4026533233].
Oct 26 20:24:05 bogon mysqld_pre_systemd[61798]: Full path required for exclude: net:[4026533041].
Oct 26 20:24:05 bogon mysqld_pre_systemd[61798]: Full path required for exclude: net:[4026532849].
Oct 26 20:24:10 bogon systemd[1]: Started MySQL Server.注意: 启动MySQL, 如果是编译安装的应该不能启动(需重新初始化), 如果rpm安装则会重新初始化数据库。
接下来我们登录数据库查看一下:
# mysql -uroot -ptestAa@123
mysql: [Warning] Using a password on the command line interface can be insecure.
ERROR 1045 (28000): Access denied for user 'root'@'localhost' (using password: YES)
我们看到因为所有数据都已经丢失,我们目前已经无法登录数据库了。本次MySQL数据库启动,是MySQL重新初始化的数据库,可以通过如下方式找到初始登录密码:
# grep "password" /var/log/mysqld.log
2018-10-26T06:12:18.237980Z 1 [Note] A temporary password is generated for root@localhost: wx_B:;sUk4?;
2018-10-26T06:16:39.369163Z 2 [Note] Access denied for user 'root'@'localhost' (using password: YES)
因此如下我们先使用密码wx_B:;sUk4?;以登录查看:
# mysql -uroot -p

//登录后必须首先修改密码才能再进行操作
mysql> show databases;
ERROR 1820 (HY000): You must reset your password using ALTER USER statement before executing this statement.
mysql> ALTER USER 'root'@'localhost' IDENTIFIED BY 'testAa@123';
Query OK, 0 rows affected (0.00 sec)

mysql> flush privileges;
Query OK, 0 rows affected (0.01 sec)


mysql> show databases;
+--------------------+
| Database           |
+--------------------+
| information_schema |
| mysql              |
| performance_schema |
| sys                |
+--------------------+
4 rows in set (0.00 sec)
上面我们看到原来的数据全部丢失了。
6) 全量恢复数据库
首先暂时关闭二进制日志:
mysql> SET sql_log_bin=OFF;
Query OK, 0 rows affected (0.01 sec)
然后再全量恢复数据:
mysql> source /root/mysql_bakup/backup_sunday_1_PM.sql
mysql> show databases;
+--------------------+
| Database           |
+--------------------+
| information_schema |
| app                |
| mysql              |
| performance_schema |
| sys                |
| test               |
+--------------------+
6 rows in set (0.00 sec)

mysql> use test;
Database changed
mysql> select * from course;
+----+-------------------------+-------+
| id | coursename              | stuid |
+----+-------------------------+-------+
|  1 | MySQL从入门到精通       |  1001 |
|  2 | 爱情与婚姻              |  1002 |
|  3 | Java从入门到放弃        |  1003 |
|  4 | 商务礼仪                |  1004 |
|  5 | 表演的艺术              |  1005 |
|  6 | 民法                    |  1006 |
|  7 | 民法                    |  1001 |
+----+-------------------------+-------+
7 rows in set (0.00 sec)
可以看到当前全量数据已经恢复。
我们在此再开启二进制日志:
mysql> SET sql_log_bin=ON;
Query OK, 0 rows affected (0.00 sec)
7) 恢复增量数据
这里我们使用binlog来做增量恢复。上面我们备份了增量日志文件master-logbin.000007,并且知道了position。因此我们可以来进行增量恢复:
# mysqlbinlog --start-position=154 --stop-position=1136 ./master-logbin.000007 | mysql -uroot -ptestAa@123
mysql: [Warning] Using a password on the command line interface can be insecure.
增量恢复完成后,我们登录查看:
# mysql -uroot -ptestAa@123

mysql> use test2;
Reading table information for completion of table and column names
You can turn off this feature to get a quicker startup with -A

Database changed
mysql> show tables;
+-----------------+
| Tables_in_test2 |
+-----------------+
| person          |
+-----------------+
1 row in set (0.00 sec)

mysql> select * from person;
+----+----------+------+
| id | name     | age  |
+----+----------+------+
|  1 | ivan1001 |   20 |
|  2 | scarllet |   18 |
+----+----------+------+
2 rows in set (0.00 sec)
我们看到数据已经完全恢复。
3. binlog日志瘦身
一般经过一段时间之后,MySQL就会有很多binlog日志了:
# ls /var/lib/mysql/
app         client-cert.pem  ib_logfile0           master-logbin.000002  master-logbin.000006  mysql.sock          public_key.pem   test
auto.cnf    client-key.pem   ib_logfile1           master-logbin.000003  master-logbin.000007  mysql.sock.lock     server-cert.pem  test2
ca-key.pem  ib_buffer_pool   ibtmp1                master-logbin.000004  master-logbin.index   performance_schema  server-key.pem
ca.pem      ibdata1          master-logbin.000001  master-logbin.000005  mysql                 private_key.pem     sys

# cat /var/lib/mysql/master-logbin.index
./master-logbin.000001
./master-logbin.000002
./master-logbin.000003
./master-logbin.000004
./master-logbin.000005
./master-logbin.000006
./master-logbin.000007
我们可以定时的对这些日志进行清理,例如:
mysql> PURGE BINARY LOGS TO 'master-logbin.000006';
Query OK, 0 rows affected (0.01 sec)
清理完成之后,我们看到:
# ls /var/lib/mysql/
app         ca.pem           ib_buffer_pool  ib_logfile1           master-logbin.000007  mysql.sock          private_key.pem  server-key.pem  test2
auto.cnf    client-cert.pem  ibdata1         ibtmp1                master-logbin.index   mysql.sock.lock     public_key.pem   sys
ca-key.pem  client-key.pem   ib_logfile0     master-logbin.000006  mysql                 performance_schema  server-cert.pem  test

# cat /var/lib/mysql/master-logbin.index
./master-logbin.000006
./master-logbin.000007
更多关于清理binlog日志的说明,请参看mysql数据库基础(八)
[参看]:
